Tuesday, January 31, 2012

Under The Sea Baby Shower

This past Saturday, I hosted a baby shower for my good friend Nikki. She is expecting a boy in April, and since her nursery is an aquatic theme, the other hostesses and I had a lot of fun coming up with cute decor and food for her Under-the-Sea baby shower!

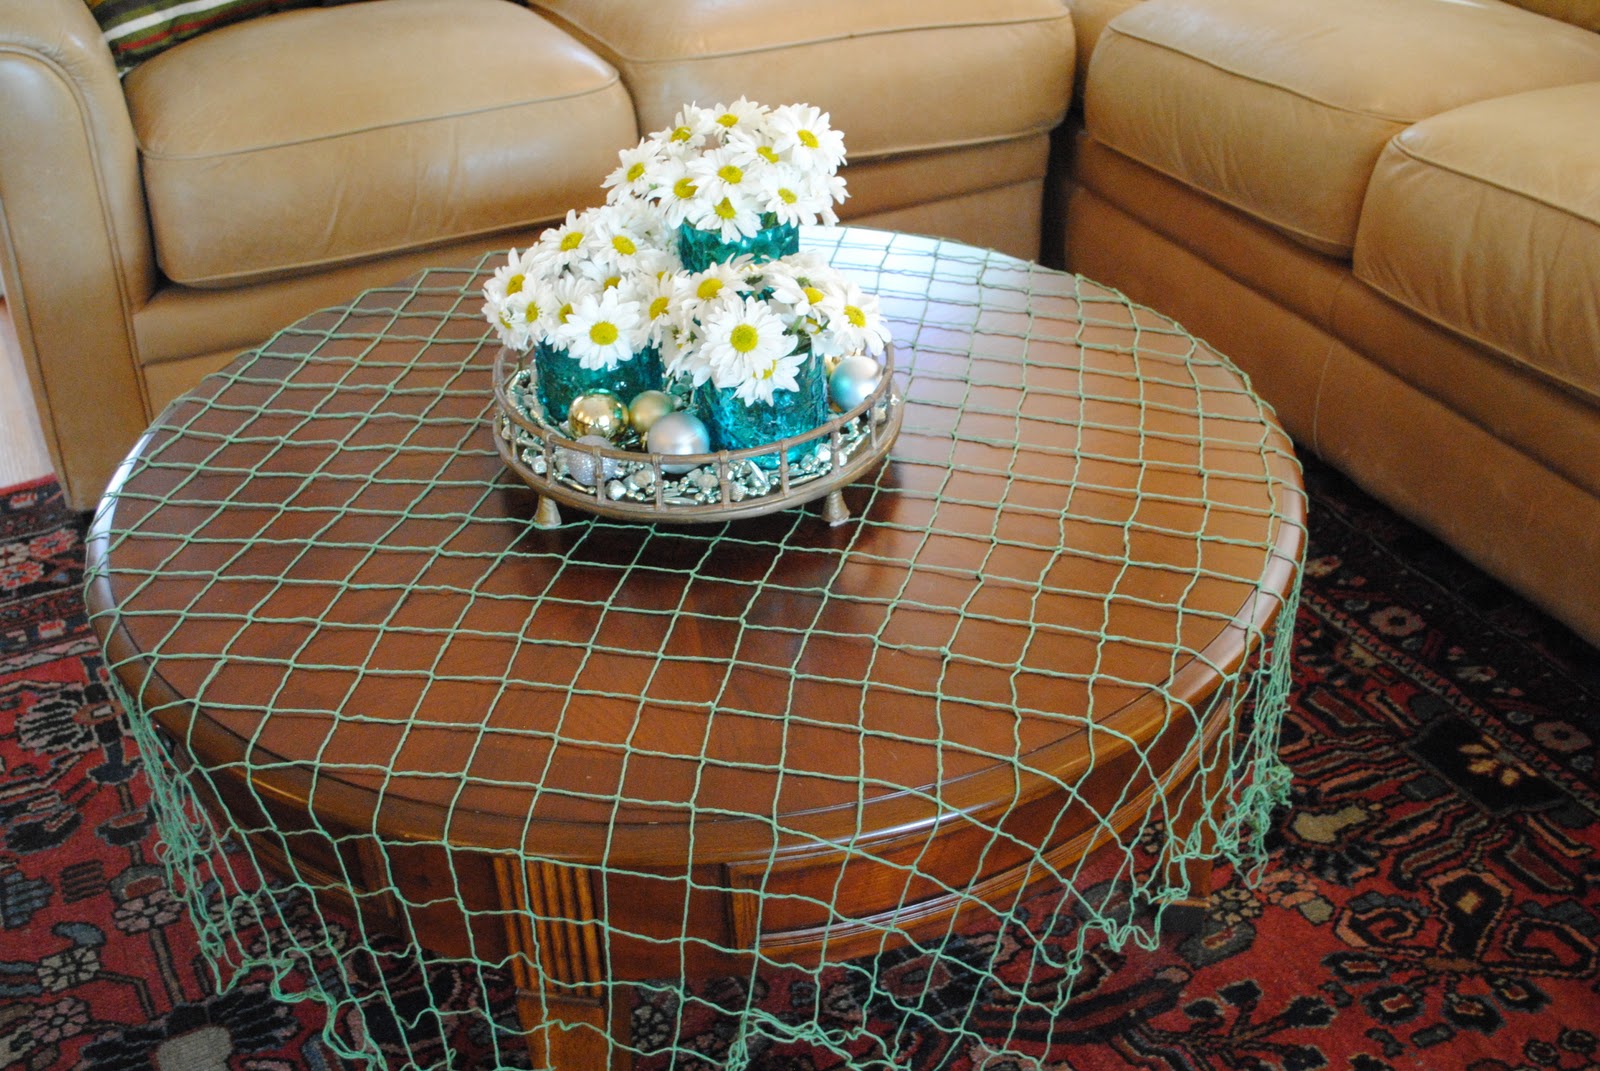
First, I decorated the living room coffee table with netting (last used here) and my 2012 New Year's decor, with some new white daisies.


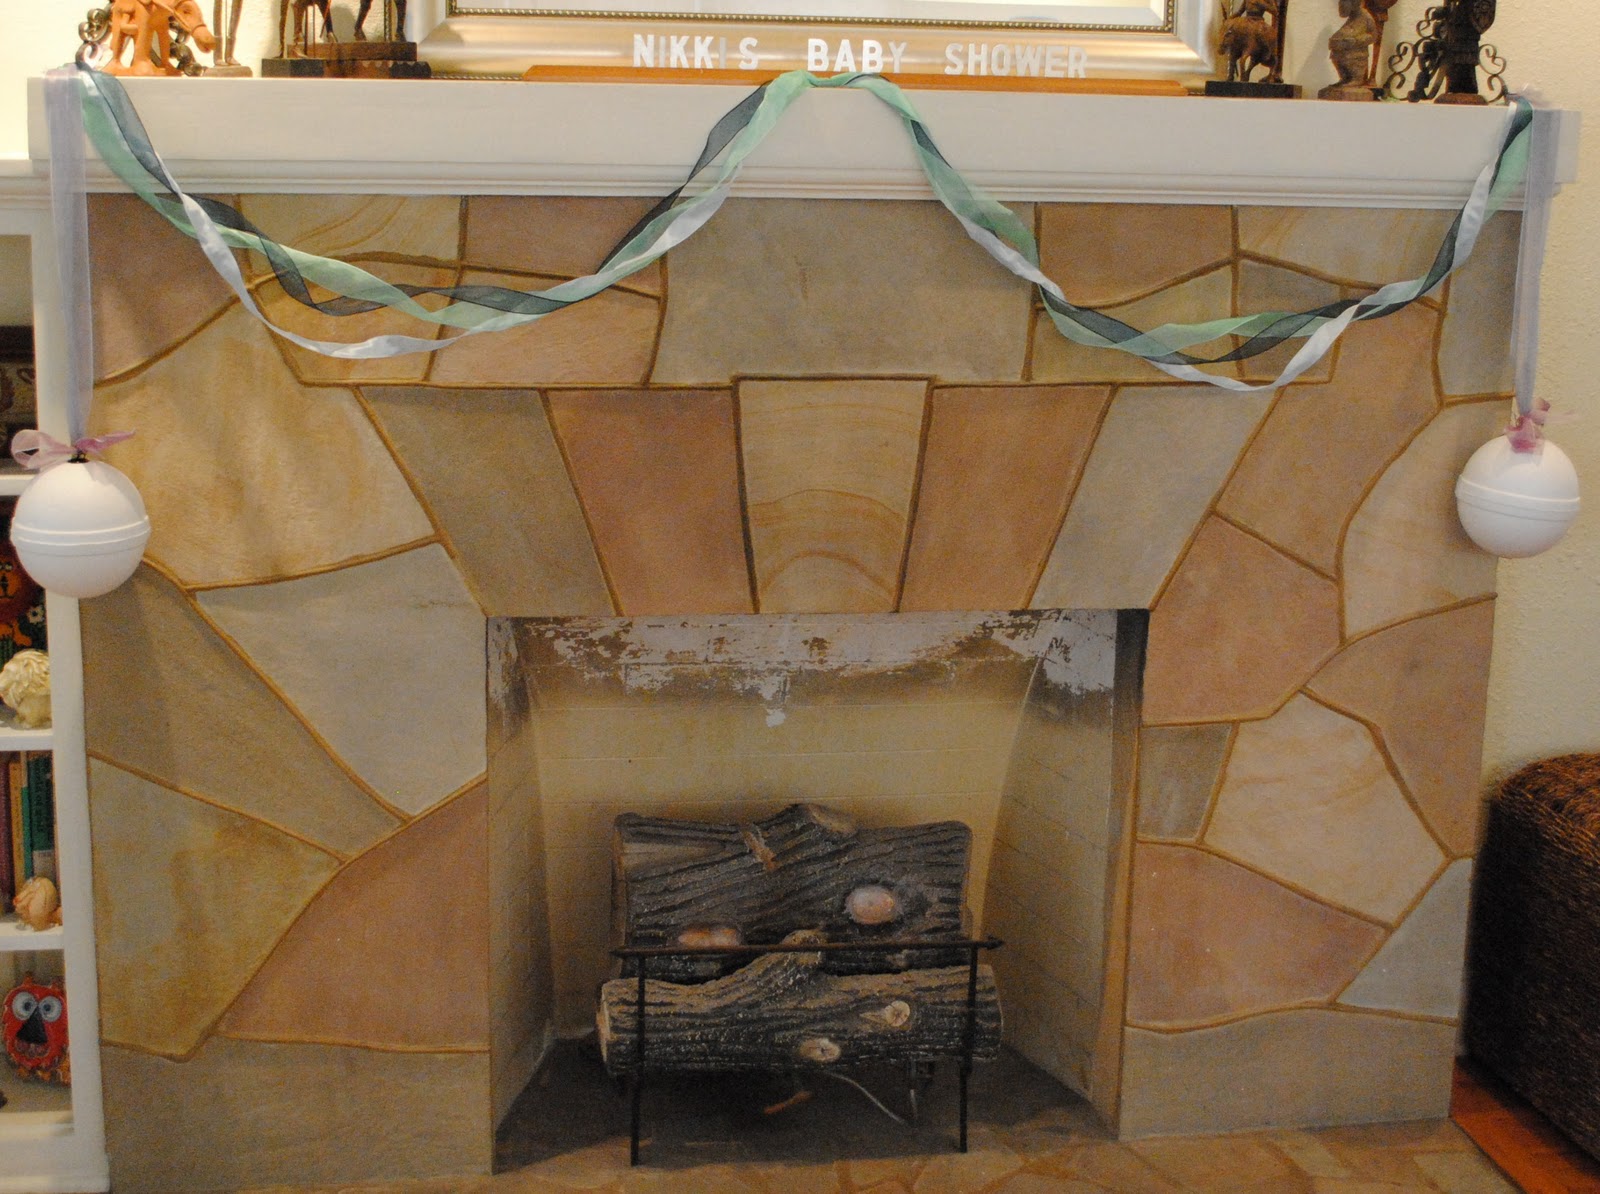
On the fireplace mantle, I used my vintage lettering, some ocean colored ribbon, and two crab trap floats ($2.29 each from here). What I found ironic was that the floats ended up looking more like baby rattles than actual sea-themed decor.


The dining room was magically transformed with the jellyfish chandelier. The how-to coming later this week!


I used a few more floats, netting, and pops of color from things I already had around the house, like the teal candlesticks. The plates and napkins were found on clearance at iParty, and the cute basket and cutlery is from the dollar store. I simply tied the napkins around a set of silverware and tied with a coordinating ribbon.


I made the same punch as I did for another baby shower, except this time, I froze the fruit ahead of time to keep it extra cold. It was served with Barefoot Bubbly, and some crazy straws I picked up months ago at Pier 1 on clearance for $1.50/pack of 6. They certainly made the Ocean Punch more fun, especially for the preggo mama and me, who couldn't enjoy the bubbly!


Since the shower was being held from 1PM to 4PM, we decided to keep the food light, as some people may have had an early lunch. In keeping with the theme, we made small tuna salad and chicken salad sandwiches, and put them on Pepperidge Farm's Goldfish bread!


 I also made a warm crab dip (recipe later this week) and added low fat Ritz crackers and Wheat Thins.


As if the Goldfish bread wasn't enough, we had to have actual Goldfish!


And for the sweet tooth, I had mini fish bowls (from the dollar store) filled with Swedish Fish and Gummy Worms. 


As recently found on Pinterest, I decided to stuff sugar ice cream cones with fresh fruit. Next time I would use the larger waffle cones, but I thought these held a good amount of fruit -blueberries and grapes filled the bottom, and we topped with strawberries, peaches, pineapple, and raspberries.


And then there is Wally the Whale. He is a cake I made with Funfetti cake mix and cream cheese icing, topped with raspberry blue straws.  He was so cute and so fun to make, I kind of didn't want to cut him up! But he was delicious, and served as the perfect centerpiece too!


As if there was not enough sugar in the cake, we sent guests home with little fish baggies filled with kettle corn drizzled with chocolate. 


So there is our baby under-the-sea themed shower! I was pretty happy with how things turned out, and would definitely use the decor and theme again. Check back later this week and next for all the details on how to make the jellyfish chandelier, Wally the Whale cake, and warm crab dip!

Saturday, January 28, 2012

Preview For Next Week...

I am hosting a baby shower for my friend Nikki this weekend. There is a lot cooking (literally), so I will be back next week with lots of cute ideas and how-to's. Until then, here is a preview:


Wait until you see what these turn out to be! Happy weekend!

Wednesday, January 25, 2012

Use What You've Got: Fried Rice


Being pregnant changes the way you cook. I don't have any cravings, but sometimes when something sounds good, I feel the need to cook it asap. The only problem being that I have really hated going to the grocery store on a regular basis, so I am in a Use-What-You've Got mentality of cooking.

I was really in the mood for some fried rice, but didn't want to order it from the local Chinese takeout place for fear of too much sodium/MSG/unknown ingredients. So I made my own (maybe it is more of a stir fry - you decide!), and it was even more delicious than what I could have ordered to go. Here it is:

First, get a wok or large deep skillet and a non-stick spatula. For some reason, my family has always had a wok, and it comes in quite handy for good stir fry, or the occasional Sunday brunch when I want to make Cafe du Monde beignets. I feel a craving coming on....

Anyway, heat your wok or skillet to medium heat.


Next, gather your ingredients. I had the following:
-Basmati Ready Rice (makes dinner done faster, and the perfect portion size for 2 people)
-Low sodium soy sauce
-Sesame oil
-Yellow onion
-Garlic (I used Korean black garlic for a truly Asian flavor)
-Sliced chicken breasts
-Green Beans

I typically like broccoli and sugar snap peas in my fried rice, but like I said, its a use-what-you-have dinner, so all I had were onions and green beans. You could also substitute frozen shrimp for the chicken, or any beef or pork you may have on hand.  You can also add the typical fried egg, but I chose to skip that ingredient this time. While the pan is warming up, go ahead and prepare your chicken breasts if you have not done so already. I cut mine into bite sized pieces.


Special Note: As mentioned above, if you wanted to add the typical egg, go ahead and fry it up in the wok or skillet before cooking anything else. Simply break it into the pan, and as it starts to cook, break it apart into small pieces with the spatula. Once it is cooked, remove from pan and set aside. You will add it back in later.

If you prefer no egg, then go ahead and add about 2 Tbsp of sesame oil to the pan, and using the spatula, swirl it around a bit to help coat the edges. 

Next add your chicken, and cook thoroughly.  Toss occasionally.


Since I was using  fresh green beans, they take a little longer to cook than other vegetables. When the chicken was almost cooked through, I added the beans so that they could get a nice coating of oil and cook while I was prepping the other ingredients.


While the beans were cooking, I chopped the onion, and put two cloves of the black garlic into a garlic press.  If you have never tasted black garlic, you really should try it. I get mine from the Savory Spice Shop, but most Asian markets have it as well. Its is not bitter like regular garlic. It is a little more sweet and is very soft. I have eaten mine just spread on a piece of toast right out of the skin. Delicious! No need to roast these garlic heads! Anyway, they have a fragrant aroma and give a little punch of flavor to the fried rice.


Once the green beans (or other vegetables) are about half way done cooking, add in the garlic and onion. 


Toss those around  to get a little coating of any leftover sesame oil, and then add about 2 Tbsp of low sodium soy sauce.


Continue cooking until onions are soft, chicken is nicely browned, and all the flavors have been infused. 

Next, I cooked two packages of the basmati rice in the microwave (you can't beat 90 seconds!) and added it to the pan.


Be sure to toss well with the chicken and veggies, and cook for another 5 minutes or so until the sesame oil and soy sauce have soaked into the rice. If you need a bit more juice, just add a little splash of soy sauce, or even some lime juice for a kick.


Turn off the wok or skillet, serve and enjoy!

Friday, January 20, 2012

BEST OF: Salad Dressings

My last post shared the simplicity of making a good salad. Here I share some of my go-to dressings, some of which are from local chefs who make simply the best, and some that my family has used for generations!


Columbia Restaurant - 1905 Salad
1/8 cup white wine vinegar
1/2 cup olive oil
4 cloves of garlic, minced
1 tsp Worcestershire sauce
1 tsp oregano
2 tsp lemon juice
salt and pepper to taste

Mix and serve over iceberg lettuce, Swiss cheese, fresh tomato slices, baked ham slices, green olives, and Romano cheese for this Columbia favorite!


Habana Cafe - Spanish Salad
From The Habana Cafe Cookbook
1 cup olive oil
4 Tbsp white wine vinegar
2 tsp lemon juice
1 clove garlic, minced
1 Tbsp basil
1 Tbsp oregano
1 Tbsp dijon mustard
salt and pepper to taste

Mix and serve over iceberg lettuce, fresh sliced tomatoes, sliced cucumbers, feta cheese, and Parmesan cheese for this Cuban delight!


Louis Pappas Famous Greek Salad
1/4 cup olive oil
1/2 cup distilled wine vinegar
Juice from 1/2 lemon
Oregano

Mix over a heaping bed of iceberg lettuce, fresh tomatoes, cucumber, green bell pepper, fresh feta cheese slices, beet slices, peeled and steamed shrimp, anchovy filets, Greek Kalamata olives, Greek Salonika peppers, radishes, green onions, and topped with scoops of homemade potato salad.


And now for some family recipes that never fail:

Simple Greek Salad Dressing
1/2 cup olive oil
1 Tbsp white wine vinegar
1 Tbsp lemon juice
3/4 tsp oregano
1/8 tsp salt
pepper to taste

Whisk together in a small bowl and serve with your favorite mix of vegetables and lettuce. 

Ron's Cesar Salad Dressing
1/2 cup olive oil
1 cup red wine vinegar
1/2 lemon, juiced
1/2 to 1 tsp Worcestershire sauce
1 1/4 tsp dry mustard
1 egg yolk (or egg beaters)
6 cloves garlic, minced
1 can anchovies
1/4 cup Parmesan cheese
splash of Tabasco to taste
salt and pepper to taste

Blend ingredients in food processor or blender until creamy smooth. Toss with romaine lettuce, large croutons, and fresh shavings of Parmesan cheese.

Let me know which ones are your favorites! PS - Thanks to Amy for asking for some of these recipes! I have been meaning to write this post for a while!

Thursday, January 19, 2012

Hostess Tip #9 - Making A Good Salad

Often when friends get together, I offer to bring a dish. I consider myself a pretty decent cook, so for a long time, I would oblige (but not be flattered) when someone asked me to bring a salad instead of some fabulous side item. However, after many years I have come to realize that I am a pretty darn good salad maker, and people ask me to bring a salad so that they don't just have lettuce and a bottle of pre-made dressing for guests. Hostess Tip #9 - Learn to make your own amazing salad.


Making good salads are pretty simple with these two steps. First: Use fresh ingredients, and stick with the ones you love. My go to ingredients are:

Romaine lettuce/bagged spring mix
Fresh sliced tomatoes
Black olives
Red or green or yellow peppers, sliced
Red onions
Reduced fat/fat free feta cheese(could also swap for shredded Parmesan cheese) 

And the second step is this: make your own salad dressing. Even if you are in a pinch and can't use fresh ingredients, and just buy a bag of mixed greens with carrots and veggies in it, a homemade salad dressing makes it a better salad. And there are only four ingredients you need for any salad dressing:

Olive oil
Vinegar (red wine, white wine, or balsamic are my staples)
Salt (I usually use garlic salt)
Pepper

The key to a good salad dressing is proportion between the ingredients. The salt and pepper is used to enhance the natural flavors of the fresh vegetables. The ratio of oil and vinegar is really more of a personal preference.... start with 1/2 cup of olive oil and 1/8-1/4 cup of vinegar. If you like your salad to have a bite, use 1/4 cup of vinegar. If you want it more mild, only use 1/8 cup. I make salads so often now that I just swirl them both over the lettuce in the bowl and don't measure. It just takes practice in knowing the ratio you like best.

Need a little more flavor in your dressing? A bonus step: Add herbs and spices from your kitchen. Basil is standard in Italian dressings, oregano is standard in Greek dressings. If you are doing a southwest salad, add a little cilantro and cayenne pepper (just a dash) for some good flavor. I also love earthy spices like rosemary and sage when using the heavier balsamic vinegar. Simply add a sprinkle or two of your favorite herbs to the top of your salad before tossing. Their flavors will be enhanced with the blending of oil and vinegar.

Have any good salad dressing recipes or tips to share? Email me at foreverthehostess@gmail.com to submit, or check out my next post on the Best Of: Salad Dressings - all my favorite go-to recipes for that special occasion!

Tuesday, January 17, 2012

Happy Anniversary!


Today is our third wedding anniversary. I am married to the nicest, funniest, most humbling and forgiving man I have ever met. We have been through seven years of adventures together, and this year may be the most exciting with our first baby on the way. I could not imagine being on this journey with anyone but him. 

Happy Anniversary Logan!
**muchos besos**

Thursday, January 5, 2012

2012 Decor

There is something about Christmas decor that makes me really warm and cheery. Having to take it down is really depressing for me every year, so when I do get to it New Years Day, I also try to substitute some sparkly decor for the New Year and our January wedding anniversary, just to liven my spirits. 

Using items I had around the house, I  came up with these small but happy additions:

This one is not really an addition, but rather a subtraction. I just took off the red table cloth, but left the Candlewick and dollar store gold and silver ornaments. See the Christmas theme here


Next, in our living room, I pulled out the teal vases, as well as some dollar store ornaments, and glittery garland to make a festive centerpiece in my vintage brass tray on the coffee table.


I added two bouquets of fresh flowers for $10 from the grocery store. I wanted all white flowers, but they mostly had Christmas bouquets left, so I will get white flowers when these die in a week.


Outside, I put up our Happy New Year flag that I bought last year at a garage sale for $3. I actually bought a couple of flags for different occasions, all around $2-$3 each. Normally in stores, giant flags are around $20-$25, which is why I look at garage sales for good ones on the cheap.


I also put back up my all-occasion wreath, that we also got at a church flea market for $1. I decorate it throughout the year with different bows, or props for certain party decor (remember the hatch?). With some glittery wire ribbon and a leftover ornament from a Christmas gift, I created a giant bow with a little finesse. I actually really loves how it sparkles, and color coordinates with both the flag and indoor table decorations!


Do you decorate for the New Year?

Wednesday, January 4, 2012

Florida Kids Free Admission!

image courtesy of Sea World & Busch Gardens
For all you Florida residents, I wanted to pass along an AMAZING deal for your kids. It is the Preschool Pass from Busch Gardens and Sea World. Simply go to this website, register your children under the age of 5 (they can be turning 6 in 2012, but must be 5 at the time of registration), and bring the e-Ticket printed from the website with a copy of their birth certificate to the front gate. They will get free admission to both parks all year through December 31, 2012! Just be sure you register online, as this offer is not valid at the front gates.

And for the Florida resident adults, buy a Fun Card for $80 for one park, or both Busch Gardens and Sea World for $136, and go unlimited through December 31, 2012 with your kids!

Let me know how your family adventures turn out!


Busch Gardens/Sea World and their affiliates did not contact or compensate me for this post. I think it is just a deal too good to pass up and wanted to share with all my friends and bloggers!

Tuesday, January 3, 2012

Grammy's Sour Cream Pound Cake

The beginning of every year, people around the world make it their resolution to lose a few pounds they gained over the holidays. Here, we are doing a few other things with the pounds.... making cakes, and gaining a few (thanks to Baby D)!

I have been meaning to make this recipe for a few months, as it was one of my most favorite things my grandmother would make for us, but just haven't gotten around to it until now. But beware, this recipe is best with its original ingredients (no substitution of fat free sour cream or light butter), so if you are trying to lose a few pounds, this pound cake is not for you.

Ingredients:
3 Sticks Butter, softened
3 cups All Purpose Flour, sifted
3 cups sugar
2 cups Sour Cream
6 eggs, separated
1/4 tsp Baking soda
1 tsp Vanilla Extract
1 tsp Rum extract

Makes 1 loaf pan, 3 small disposable loaf pans, or 5 mini loaf pans

First, preheat the oven to 375 degrees. I prefer to separate the eggs first, since it seems to take the most time. I did not mean to color coordinate the separated eggs with their bowls, but it worked out perfect!


 Next, beat the egg whites in your mixer until stiff.


 Set aside egg whites in a small bowl to be added in later.

Next, combine butter and sugar. Then add egg yolk one by one as the mixer is churning. 


Next, add the baking soda and sour cream, and mix well. 


Gradually add in the flour, vanilla extract and run extract, and mix well. 


The final step is to fold in the egg whites into the mixture. I set my mixture to the Stir setting as I dumped the egg whites in, and then after about 10-15 seconds, I stopped the mixer and used a spatula to help fold them into the batter. 

Next grease your loaf pan(s). I decided to make mini loaves, since I had to take some to my Grandmother, since it is her recipe.


 Bake in your oven at 375 degrees for 1 1/2 to 2 hours. I cooked mine for 1 hour and 20 minutes. The top rack was done, but the bottom took another 20 minutes. The time range all depends on your oven and the size pan you are using.


 When they are done, they should have a crispy golden top and if you stick a toothpick in the middle, it should come out clean.


 Serve with some vanilla ice cream, or strawberries with whipped cream. I also just ate mine plain for breakfast, it is so yummy! Enjoy!


SHOP