Showing posts with label Favors. Show all posts

Wednesday, May 2, 2012

Cute Baby Shower Favors

I still owe baby shower updates, but wanted to show you two quick baby shower favors. The first is not one from my baby shower, but from one of a family friend who is having a boy:

They took a Styrofoam cup and cut it and hot glued the sides over like a shoe. Next they added a brown and white bow and some blue tissue paper, and then filled the shoe with candy. How cute and simple is that?! I love it!

The other idea was a really cute from one of my showers, especially since it was more about the mom-to-be than the baby! Bourdeaux colored OPI nail polish and a cute saying for my stylish baby-to-be:

From fingerpaints to nail polish... Bottles to Bourdeaux... There's no doubt Baby D will always be the most stylish kid we know!

One of my favorite favors ever!

Have you come across some cute baby shower favors recently? If so, be sure to share!

Tuesday, June 14, 2011

Monkey Baby Shower

This past Saturday, I helped host a baby shower for my dear friend Janet, who is due in August to give birth to her son, Max. Since she is doing a monkey theme in the nursery, we decided to have a shower that had a bit of a monkey theme. We kept the colors to yellow, green, and brown, and I used the monkeys sparingly. However, I did make some great banners in the party colors, and they are kind of the grown up versions of vines (which monkey's swing on- get it?). There will be a post later on how-to make the banners. Here is a look at what we put together:

For flowers- I love fresh flowers! Simple is usually best, and can be a great accent to any party decor, even if they are in small bunches. I bought these bunches of mums and daisies at Publix 3 bunches for $12. I love how the white daisies have green centers. I simply put them in clear glass vases and tied the brown and white polka dot ribbon, that we used on the invitations, around them.


For decorations, I made three banners using fabric quarters from Joanns and the brown and white polka-dot ribbon from Michaels. I also used some green glass ornaments to hang on the chandelier to give a pop of green.


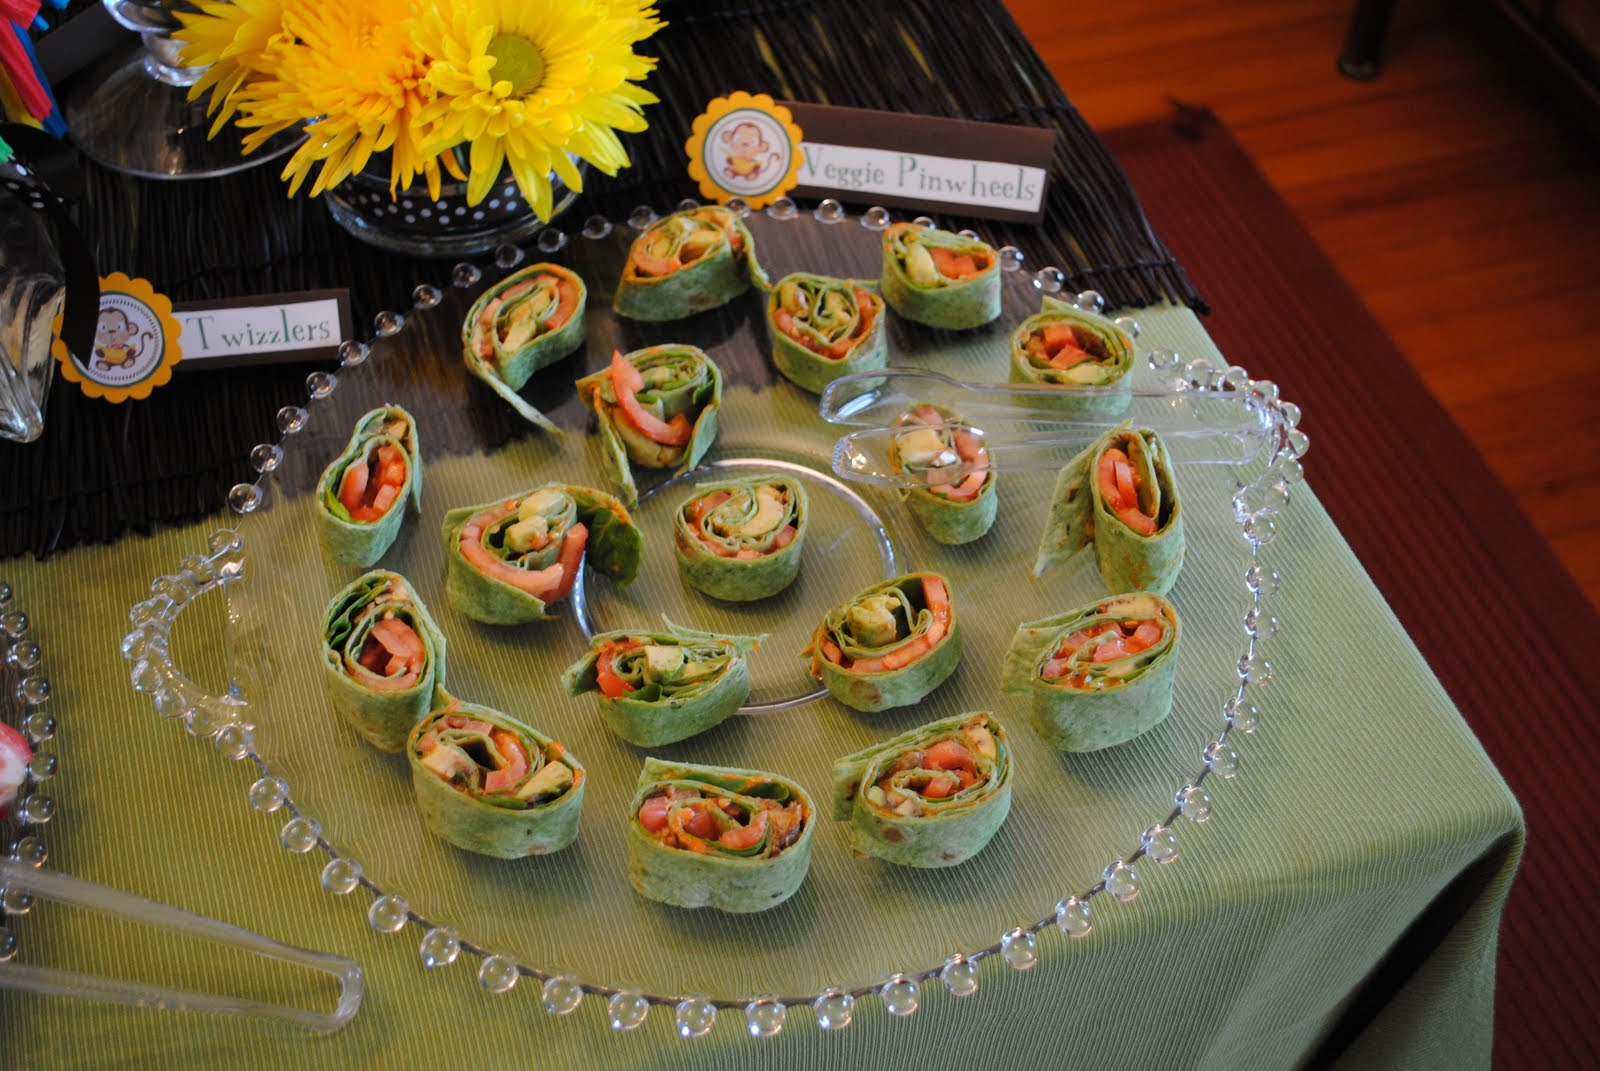
Since we wanted to keep things simple, we opted for a dessert shower... lunch is sometimes hard to do with more than 10 people and no where to formally seat them. We had the shower at 1:00PM and served punch with champagne, fruits and veggies, some small veggie wraps, cookie bars and mini cupcakes, banana bread, and a candy bar with Runts, Lemonheads, Twizzlers, and pear, banana, and chocolate flavored saltwater taffy (bonus points for those of you who noticed the "banana" references).


I also used the same monkey clip-art from the invitations and paper punch to create the food and drink labels.


For games, we played "Guess the Baby Food" and "Measure Mommy's Tummy". For the "Measure Mommy's Tummy", I put a little spin on the game to go with the monkey theme. I went and bought two Barrel of Monkeys and the guests has to guess how many monkeys would make up the circumference of her belly. We showed them the length of the first 12 monkeys just for an estimate. She ended up only being 14 monkeys around! And for the baby food game, as expected, we had some unwilling participants who couldn't bring themselves to eat the baby food. I made this sheet for guests to use to write down the ingredients.


And last but not least, I went to a local soap shop, Milagros, to get Milk and Honey soaps for the guests, "From Janet's Shower To Yours". I used the same ribbon to tie little clear bags and I made tags with the paper punch.


Despite a rough morning, we pulled it all together and it was a really nice shower. Janet got most everything she needed to complete her nursery as well. Check back soon for some of the recipes and how-to's on the details!

Monday, December 20, 2010

DIY: Sequin Ball Earrings

A frequent visitor to the Martha Stewart site, I always look at her homemade gift ideas for the holidays. I always have a DIY party favor for guests at an annual dinner with some girl friends. I loved her Sequin Ball Earrings (at right), but after reading the directions, it seemed a bit difficult with the whole chain drop and making the sequin ball.

However, after perusing Pier 1 for another gift, I came across these Sequin Spheres for $5 a box! I loved that they came in three festive colors, and that there were 30 balls in the box, which could make 15 pairs of earrings.  This was one easy solution to the problems I had with Martha's how-to! So off to the craft store for the rest of the supplies needed to make the earrings.


I purchased gold plated hooks and gold head pins to feed through the balls and attach to the earring hooks. I also used jewelry pliers that I already owned to help bend the wires. I think the entire project cost me under $10. Here is the step by step how-to make the sequin ball earrings:


Step 1:
Set out your supplies by pair, so you make sure you have enough of each. You need two sequin balls, two hooks, and two head pins.
Step 2:
Feed one head pin through the sequin ball. The middle of the ball is styrofoam, so it it easy to press the pin through. Try not to force it, as the pin bends easily and you want to keep it as straight as possible before the next steps.

Step 3:
Push the head pin all the way through the ball until the head is flush with the bottom. Be sure not to push too hard that the head actually goes into the ball. You want it to remain outside of the sequins.

It should look like this when you have it through.
Step 4:
Feed the hook onto the head pin.
Step 5:
Clamp the hook and head pin with one set of pliers and hold in place while performing Step 6, below.

Step 6:
With a second set of pliers, grab the end of the head pin and bend it in half to form a loop. Obviously, I could not take a picture of the pliers bending the wire, as I needed both hands, so here is what it should look like after you bend it. 

Step 7:
Continue to use both sets of pliers to bend the pin around the stem of the loop to secure it in place, until the entire pin is curled around the loop.
Step 8:
Repeat all steps above for second earring. Voila! You have a pair!
I really love how they came out and in such festive colors. I wrapped them up in little boxes and randomly set them at each place setting. It was fun to see which guest got what color! And I kept a gold pair for myself that I will be wearing year round for that party perfect sparkle!

Friday, November 12, 2010

Give Thanks

I came up with a quick and easy centerpiece for fall and Thanksgiving, all for about $10.

 My local grocery store had bags of gourds and mini pumpkins on sale for $2 each, and I also picked up a bag of oranges for $3, and some whole cloves for $3. At home, I used the cloves to decorate the oranges - just stick them in! I decided to decorate a few oranges with dots and with stripes.

Half way through the oranges, I realized I could spell out words (and luckily had enough oranges left!), and so I came up with T-H-A-N-K-S. I pulled out my two large glass canisters and my antique Candlewick cake plate, and arranged  them in a trio on the table. Then I filled the canisters with mini pumpkins, gourds, and the plain oranges. I left a few of the beautiful orange and green gourds out to be placed with the alphabet oranges. What do you think?

I know that the oranges may not last until Thanksgiving, but it was so easy and quick to do that I can always whip up another batch before Thanksgiving.  Maybe even do multiple groups of different words, things to be thankful for.

This would also make a great place setting for your Holiday table. Just use the letter of the guest's first name spelled out in cloves, and place the orange on their plate. Guests will have something sweet and savory to take home with them. 

Since our dining room is in the middle of our house, I see this centerpiece a million times a day, and it constantly brings me warmth. The smell of the oranges and cloves has filled the house with their autumnal aroma, and the simple word of THANKS is a constant reminder of all we have to be thankful of this year.

Thursday, October 28, 2010

Dazzling Mini Pumpkins

So I did not get to my pumpkin carving last night, but I did do a pumpkin project that is just as cute: Dazzling Mini Pumpkins!


This project can be super easy or super hard, depending on how intricate you want to get. It does take a little bit of time, but can be done by adults and kids of all ages. 

Start with mini pumpkins, or in this case, I used white marbled gourds sold in a pack of 3 for $2. I purchased self adhesive round rhinestones and elongated black beads at Joanns, as well as some superglue for this project. The round self adhesive rhinestones were easy to work with (no glue needed!), but I did find myself tired of peeling off the paper from such tiny things.  They easily made cute dots and letters. I made up the font of my letters, but yo could put in a little extra effort to find one you like online and try to replicate it.

The elongated black beads were much easier to work with to make the lined pumpkin, but needed to be glued on. I chose super glue so that they would stick and stay immediately. However, this is not recommended for children. My suggestion would be to use a craft glue and maybe bead the top half, wait for it to dry, and then flip it over and bead the bottom half.
You could certainly buy larger rhinestones and decorate a larger pumpkin too. I just love the little ones, and this great project is not only for Halloween, but can be left around the house through Fall!

Sunday, October 3, 2010

GO GATORS!

 
Last night we hosted a University of Florida (our alma mater) vs. Alabama party for one of the biggest football games of the year. While the game did not have the outcome we were hoping for, the party was a great time had by all. The food we served was typical game day food, and the decorations were from our Gator collection, having been fans since we were young. I made the two sided invitations on Microsoft Publisher, using some free clip art found on the web:


Years ago, my dad, also a big Gator fan, was given this plaster 5 foot alligator as a gift. He passed him on to us a few years ago. Normally, we keep him on our porch, but he made a great centerpiece on our dining room table. I like how he is a bit intimidating! I used some orange fabric I got at Joann's for $1.50/yard and then used some blue place mats from HomeGoods ($5/pack 4) as the runner. The orange utensil and plate caddy was found on clearance at Dollar General for $1.50. All of the Gator plates and platters were gifts that have been given to me over the years, but you can find them online and in stores at Bealls and Gator Haven. They really make a table setting more festive and into the college spirit!
As part of the tailgate food fare, we served classic 7-layer dip and Buffalo Chicken Dip with Tostitos Scoops.


We also served hamburgers and hot dogs right off the grill, and they seemed to get the cheer of approval from Mr. 2 Bits. The foam Gator heads we bought at the dollar store last year - they are actually hats but looked like Gators lurking out of the Florida swamp on our tables. And the football condiment bowls and spreading knives came as sets from Dollar General for $2 each. It was also the first time I have tried the new Oscar Mayer Angus Hotdogs (because they were on sale and I had a coupon), and I have to say they were delicious!

For dessert, I made some Pumpkin Bread muffins with cream cheese frosting. Every year, I seriously buy stock in Williams-Sonoma's quick breads. They are the easiest things to make, and even give as presents or housewarming gifts. I made some Gator toothpicks (tutorial to come) to help decorate!

And lastly, there were a few goodies for our guests to take with them. I really wanted some Orange and Blue candies to have on the table too, but it is difficult to find Blue candies this time of year. I went to our local Cracker Barrel, because they always have a great selection of fun candies and in an array of colors. As I walked in, there before me was an entire table of Florida Gator apparel and treats!

These pre-wrapped mints, which I labeled "Gator Mints for Gator Breath", were $4 for a pack of 100, and the football was made of crispy chocolate for $3. And in case our guests needed a little extra Gator spirit, we had University of Florida Silly Bandz for them to show their true team colors. Hopefully this party will bring us some luck for the rest of the season... Go Gators!!!

Friday, June 25, 2010

TOY STORY Party

As huge PIXAR fans, my husband and I wanted to host a "TOY STORY 1 & 2" movie night for our friends and their kids, before "TOY STORY 3" came out in theaters. Using a photo of and "Etch-a-sketch" online, and a free downloadable "Etch-a-sketch" font, I created the invites:


I thought it would be easy to find Toy Story toys at garage sales and on eBay that I could use to decorate with, but with the new movie coming out soon, the toys online were in high demand. I managed to find a few for under $5:


Buzz and Woody are having out on the food table, and you will notice I used my silver letters again to show the party's theme. Because we invited our friends and their children, we wanted the food to be kid friendly (and honestly, who doesn't love pizza bites and corndogs?!). Here's Rex hanging out with the pizza bites:


And Bullseye hanging out with the corndogs:


I kept bright colors with the plates and napkins and serve ware, and added some Dollar Store Slinkys and army men to scatter around the house. Here you'll find the amazing 7-layer Mexican dip and chips.... a huge hit!!!


And Peanut butter, M&Ms, and chocolate chip cookies. I used some clip art in both spaceships and sheriff's badges to make food labels.


And what movie night is not complete without popcorn! Buttered popcorn and kettle corn were served in mini bags, which I found on clearance after Christmas, and just kept in the closet for a special occasion. Kids (and adults) don't like to share popcorn, so everyone got their own bag!


Kids got a goody bag to take home. The bags were left over from another party and tied with some leftover ribbon. I used the same clip art to use name tags, and the bags were filled with "Toy Story" stickers, "Toy Story" gummi snacks, silver sheriffs badges, and Slinky's. I used a vintage Slinky to decorate the bowl.


We watched both movies back to back on the lawn, and I think everyone had a great time. We're all ready to see "Toy Story 3".

SHOP