Showing posts with label Party Idea. Show all posts

Thursday, July 14, 2011

DIY Photo Booth

At the party, I wanted a little more than just shuffleboard. After seeing the adorable props on Oh Happy Day, I just couldn't resist a little photo booth! I purchased some blue background fabric on clearance at Joanns, and simply hung it over some items in the clubhouse. I printed out the props from Oh Happy Day (below) and used spray adhesive, outside in a well ventilated area, to attach them to white foam board. Using an Exact-o knife and a sharp pair of scissors, I cut them out and attached them to sticks (i.e. pencils in packs of 10 from the Dollar Store = $2). I then added a few more props, like giant sunglasses, dollar bills (to make it rain), and cute sayings, to complete the photo booth.


Check out the photos below.... even though we had to wrangle a few guests to try it out, many loved it and took multiple pictures. I think it was a success!


Thanks again to the very talented Jordan at Oh Happy Day for providing the fun props and idea!

Friday, July 1, 2011

One Week From Today...

I will turn the big 3-0. It is a little bittersweet, and when thinking about the date months ago, I really wanted something low key, maybe a nice dinner party with family or close friends. I had thrown a rather large and elaborate party for my husband on his 30th, and had vowed to not repeat it for mine. It was just too much work, although he had a blast and so did all our friends.

It was not until about a month ago that we went to an event at the local and historic shuffleboard courts that I pictured this as the place for my 30th birthday bash. It will still be a small affair, with family and a handful of great friends, but with some very special, Hostess touches, of course! And just to give you a little preview, here is the invitation, made by me:


My wonderful husband is working on some other details, so after the party, I will post all the details! Until next week, hope you all have a wonderful 4th of July Weekend!

Thursday, June 16, 2011

Punch It!

For the Monkey Baby Shower, I wanted to serve a punch that could be for both non-alcoholic for the mommy-to-be, and alcohol-optional for the rest of the guests. In my blog searches, I came across a punch recipe by Eddie Ross that I adapted to make this one. Here's the my recipe:

-One 2-Liter of Fresca
-1 cup of Orange Juice
-Sliced Strawberries
-Sliced Peaches
-Green Seedless Grapes
-Ice
-Champagne (optional), to be poured in later

That's it! So easy, right?! Eddie's recipe used white wine instead of orange juice, mixed with the Fresca and fresh fruit. I have to say that the champagne added to the glass gave it a little pop, but it was the strawberries and peaches that really made the drink. The flavor was so yummy and delicious that even my husband liked the non-alcoholic version! After the guests left, I bottled the rest (without fruit) and kept it in my fridge for a few more days . It was a perfect drink for any summer get together!

Thursday, May 5, 2011

Cinco De Mayo

It has been a busy week, and the blog has been a little neglected due to a mini vacation starting tonight! What a way to kick off a vacation at the beach with Cinco de Mayo! If I were hosting a party though, here is what I would do:


Set the Table:
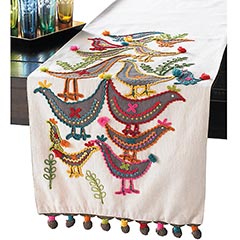
I love my Pom Pom Bird Table Runner from Pier 1. Throw it over a vintage yellow table cloth for a table setting that screams Ole!

I am also loving this garland from Anthropologie's BHLDN, but I am sure there is a cheaper way to DIY.
Food & Drink:

Serve some fresh salsa (recipe here) and Margarita Punch (recipe here). I recently made some chicken enchiladas, but tacos are always a good Mexican staple. You can set up a Taco Bar with lots of different toppings.


Dress Like A Hostess:

Etsy has some great Mexican embroidered dresses, and I am loving this cobalt one from Crooked Tree Vintage.


Happy Cinco De Mayo!

Monday, March 28, 2011

Pi Beta Phi Luncheon

Growing up in a mixed household (Daddy is a Gator, Mom is a Seminole), it was a difficult decision to pick a college. One weekend my senior year of high school, we visited both schools so that I could "pick one". No pressure, right? Being the good daughter that I am, I made the playing field fair for all parties... I chose Daddy's school (Go Gators!), and my mother's sorority (Pi Beta Phi).


Years after college, I am still involved through the local Alumni club, along with my mother, grandmother, and aunt who are all Pi Phis too! This year, I became a little more active in our club's activities, even hosting the Pink Party.

Coming up in April is our sorority's Founders Day, and I am helping plan and decorate a luncheon to celebrate with other two other local Pi Phi Alumni clubs. Our theme is Celebrating the Magic of Sisterhood, so we are using the MAGIC theme for our decor. Here are the invitations I created:


For decor, we are going to use glittery top hats filled with flowers similar to this:


But we are going to add magic wands with star garland coming out of the flowers for a little more pizazz! Check back soon for more details about this project!

Tuesday, March 22, 2011

Baby Shower Inspiration

As you may remember from this last post, the Baby Shower for my friend Kim is coming up. Since it is being held at a Spanish restaurant, and she is not a fan of pastels, I went with a Spanish/Moroccan theme, as far as colors go. I had in my photo archives the following pics of inspiration if you know the source, let me know!):

I Have also ordered this Titan & Birch colored Suzani fabric to dress up the tables:


What's great about using fabric for tablecloths is that you can always wash it  and use it for another project. Maybe future pillows for my brother's house?

Also from my inspiration files was this photo of a vintage vase with bright flowers. Using the Suzani fabric as a base, we have turquoise and red vases that will have bright yellow and pink flowers in them that will be placed around the space. 

And since we are not opening gifts, there will be a little activity for all the guests to participate in. More details to come!

Saturday, March 5, 2011

Sip & See Shower & Inspiration

I am planning a "Sip and See" shower for a good friend of mine with a twist. Most "Sip and See" showers are planned for after the baby arrives, so that Mommy can drink, and everyone can "See"  the newborn. However, in this case, the mom-to-be has two other more formal showers, so she wanted something fun, but she is pregnant with twins, so there will be no time after the birth to put together a viewing party.  So here's what we are calling it:

Sip and See The Mother To Be

Really original, I know. So this is more of an anti-shower, cocktail party, completely void of any games, opening presents, and measuring mommy's tummy. Seriously. How am I getting away with not opening presents? Well, included in the invites is this poem:

As Kim is soon to be blessed with twins,
She doesn't really need clothes or bibs with stripes.
She’d prefer to stock up on everyday things,
Like diaper cream, shampoo, Pampers, and wipes.
If to give a different gift is your intention,
In modesty we would like to mention
A donation that will be life
-saving for the twins one day
 Even a little will go a long way!

Kim has decided to register for donations toward preserving her babies umbilical cord blood, in the event that they may need it after their birth, so her registry web site will be at the bottom of the poem for guests. A really practical gift that can have so much impact later. For more information, please check out this website.


Since the event is going to be held at the Columbia Restaurant, so I wanted kind of a Spanish/Moroccan color theme. Here is the invitation I created:
I will be updating with more information about the food, specialty drinks, activities, and centerpieces soon!

Sunday, December 19, 2010

Ribbon Place Cards


I have become a bit obsessed with vintage letterpress, and after scouring the internet for a set of block letters to use for stamping, came up with a cheap and fun idea for place cards.

I found an inexpensive rubber stamp kit at Michaels that I used a 50% off coupon during the black Friday sale for around $5. I also got a gold ink pad for about $4 and some white and gold ribbon for $0.50 a spool.

About half an hour before an annual Christmas dinner with some friends, I cut the ribbon into 12" pieces, and simply stamped their names onto one end, and tied them onto my vintage stemware. The stamp set I bought was the Typewriter font, and included both capitalized and lowercase letters. I chose to use the lowercase for my names since it looked a little more fun and festive. I love how they turned out, and the ribbon really dressed up the glasses too!

I also bought black ink that I can use on a darker color ribbon, like red for Valentine's Day, or a more elegant party or shower. Of course you could use the stamps on some colored paper for gift tags too.

I kept the dinner simple with red square paper plates from Target, and some bright green polka-dot napkins from the party store. Each guest got a brightly wrapped gift - check out the How-To tomorrow!

Cheers and Merry Christmas!

Friday, October 29, 2010

Halloween Dining Decor

I am having some Ghouls over for dinner tonight, and decided to spruce up the house with some easy Halloween decor. Here is the dining room:
I used the same orange fabric from our Gator party, and added a cute cutout spider web runner from Pier 1. Here's a closer shot. 
The black wrought iron candlesticks were my grandmother's, and I have no idea how old they are. The blood taper candles are also from Pier 1. The spider is from the dollar store and I just suspended him from the chandelier.

In the background, you may see the mummy tray. I wanted to create one like Martha, and since we had a vintage glass head from a garage sale trip years ago, it was just too easy! I simplified Martha's recipe since I didn't want to deal with anything sticky. It came out just as I had hoped!

  • Start with the head. You can get a Styrofoam one or a glass one, and actually I have seen vintage reproductions of my glass head at Pier 1! 
  • Next, get two large rolls of gauze. The night before, heat up some hot water and either regular tea bags or instant coffee on the stove. 
  • Once it is hot and brown in color, remove from heat and let cool for a few minutes, or until it is at a safe temperature to touch. 
  • Place each roll of gauze, unraveled, into the pot for about a minute.  
  • Remove, wring out in the sink (do not rinse), and place on a paper towel lined cookie sheet. You need to let the gauze dry out for about 12-18 hours.  
  • Once you have the gauze dry, simply wrap it around your head until it looks like a mummy! I used about 1 1/2 rolls around the head and then draped the rest along the tray. 
I used a large silver tray from Salvation Army ($2), and after cleaning it, covered it with napkins, since I will be putting food around the mummy.  A super easy project that I will definitely replicate next year!

More to come this weekend as Halloween comes. Check back soon for more fun and fast projects before Halloween night!

Friday, October 1, 2010

Breast Cancer Awareness Month - The PINK Party

As you may know, October is Breast Cancer Awareness Month, and PINK is the universal color for awareness of this terrible disease. Two week ago, I hosted a ladies "PINK Party" rally brunch for our local sorority alumnae team to participate in this weekend's Race For The Cure Breast Cancer Awareness Walk/Run. We raised money for the team, and had a delicious brunch, with all PINK inspired food. Check it out!

Bagels with PINK cream cheese and Lox (Salmon)


PINK Penne Pasta (Made with Vodka Sauce) with Grilled Chicken and Shrimp


PINK Watermelon Salad (recipe found here)


A PINK Dessert Table, featuring:


PINK Cream Cheese Candies, that my mother made (recipe to follow), and Homemade PINK swirl cupcakes.


And who could forget the drinks?! We had PINK Lemonade and PINK Flamingos (vodka, triple sec, grenadine, and orange juice) to celebrate!

To decorate, I used simple pink and black felt table runners that I had made previously for a wedding shower. Since most of the food was pink, I decided to let it stand out by using my clear vintage glassware. White plates would have the same effect. I tied nameplates on each food item to let people know what they were eating, using simple ric rack in PINK and cutting out black paper circles. Just hole punch the top and use a gold or silver pen to write on the black. Top the table with some pink roses and you are set. A quick and easy party idea for any occasion!

And because it is Breast Cancer Awareness Month, I encourage you to visit the Susan G. Komen Foundation website here for events in your area, ways to donate, get involved, or even just how to give yourself an at home breast exam. Take a few minutes to educate yourself and get involved, to save someone's life, if not that of your own. Here's to PINK!

Friday, June 25, 2010

TOY STORY Party

As huge PIXAR fans, my husband and I wanted to host a "TOY STORY 1 & 2" movie night for our friends and their kids, before "TOY STORY 3" came out in theaters. Using a photo of and "Etch-a-sketch" online, and a free downloadable "Etch-a-sketch" font, I created the invites:


I thought it would be easy to find Toy Story toys at garage sales and on eBay that I could use to decorate with, but with the new movie coming out soon, the toys online were in high demand. I managed to find a few for under $5:


Buzz and Woody are having out on the food table, and you will notice I used my silver letters again to show the party's theme. Because we invited our friends and their children, we wanted the food to be kid friendly (and honestly, who doesn't love pizza bites and corndogs?!). Here's Rex hanging out with the pizza bites:


And Bullseye hanging out with the corndogs:


I kept bright colors with the plates and napkins and serve ware, and added some Dollar Store Slinkys and army men to scatter around the house. Here you'll find the amazing 7-layer Mexican dip and chips.... a huge hit!!!


And Peanut butter, M&Ms, and chocolate chip cookies. I used some clip art in both spaceships and sheriff's badges to make food labels.


And what movie night is not complete without popcorn! Buttered popcorn and kettle corn were served in mini bags, which I found on clearance after Christmas, and just kept in the closet for a special occasion. Kids (and adults) don't like to share popcorn, so everyone got their own bag!


Kids got a goody bag to take home. The bags were left over from another party and tied with some leftover ribbon. I used the same clip art to use name tags, and the bags were filled with "Toy Story" stickers, "Toy Story" gummi snacks, silver sheriffs badges, and Slinky's. I used a vintage Slinky to decorate the bowl.


We watched both movies back to back on the lawn, and I think everyone had a great time. We're all ready to see "Toy Story 3".

Wednesday, May 26, 2010

LOST Finale

As "LOST"ies, we were super excited for the "LOST" finale that we hosted a "LOST" Finale party, with a showing on the lawn. For a show that was set on an island, it was difficult to decorate with island-themed decorations for a show where the island was more hell than paradise. So I had to improvise with some different options.

For invitations, I found some photos of the show's "OCEANIC AIRLINES" tickets online. I found some "OCEANIC" logos online to download, as well as created a bar code from the numbers 4-8-15-16-23-42 to use on the ticket. I made these in Publisher with each guest's name on them, as well as ticket and seat numbers with the famous numbers, and sent them out in "Oceanic" envelopes. I thought they came out pretty well:


I have a set of silver letters with wood bases that I use to decorate for a themed party. I broke these out to see what I could make with the letters that I had. I was able to spell "L-O-S-T" and decorate the food table with a simple green table cloth and some netting that I found at the Dollar Store.


It was late in the day when I realized that my husband picked up this giant vintage screen print airplane for $5 at a church sale, to be used someday in his retro man-cave in our next house. It was perfect as a backdrop to our food buffet. If you look closely, you will see I used my lettering kit to spell "Oceanic Flight 815", and set our antique clock to 8:15PM. You may also catch a polar bear or two around the house, another significant event in the world of "LOST".


Weeks before we finalized the party, I found an amazing website that had every food label you would need from the Dharma Initiative. If you did not watch the show, a quick recap: there were experiments being conducted on the island by the research group, the Dharma Initiative. All of their food was generically labeled. I printed out labels for all the food and drinks we served, and I have to admit, our fridge was a bit intimidating:


I served chips and salsa, mini chocolates, island fruit, and friend chicken from "Mr. Clucks Chicken Shack". Since the finale was not on until 9pm, we went light on the food.

My sister-in-law was equally as intimidating as the fridge, in her awesome, homemade "Others" jumpsuit. You also may notice I had the infamous numbers on the mantel:


To set the scene at the front of our house, I realized that our rustic wood wreath could be converted to a Dharma symbol with a little black ribbon. I then used some sticky numbers, purchased at Michael's for $2, to add to the ribbon to add the LOST numbers again. With a little brown paper covering our wood and glass door, I cu out the paper from just behind the wreath to make the "Hatch". I think it looks pretty amazing with our tiki torches and the glow from the inside of the house.


And all of the "LOST"ies got to take home air sickness bags, courtesy of "Oceanic Airlines", for which I created labels as well. Again, I filled the bags with mini airplanes, bags of peanuts, and Goldfish (remember the fish shaped cookies in the bear cages where Sawyer and Kate were kept?). And some more polar bears lurking around the house:


The finale was not the most popular event, as most people who left at 11:45PM were scratching their heads trying to figure out what just happened, in true "LOST" fashion. As much as they didn't remember from the entire show, I'm sure they won't forget the party!

SHOP