Showing posts with label How-To. Show all posts

Friday, February 10, 2012

How To: Wally the Whale Cake

The invitations that Michelle, a co-host and sister- in-law, designed for the baby shower had a really cute whale on them. When discussing the theme one day, I suddenly got the idea for a 3-D whale cake, and how I thought I could execute it.
I searched online for what I had in mind, but alas, all the whale shaped cakes were 2 dimensional, as in a decorated sheet cake. Our mom to be deserved a delicious cake and one that was really cute too! So I took photos as I went along in the event that it turned out close to what I had envisioned, and I am happy to say, I now have a bit of a tutorial for you! Its a long one, so maybe just glance through it unless you are really determined to make it in the future! It takes a good amount of time and patience, but the end result is so worth it!

I first started with two boxes of Funfetti cake mix, vegetable oil, water, and eggs. Mix ingredients per the directions on the box. Confession: I actually bought 3 boxes in the event I screwed up the cake that took 2 boxes and needed to make simple cupcakes for the party!

Bake the cake to the instructions on the box. I actually cooked mine for the maximum time it stated, as I did not want the cakes too soft, since I would be stacking them. For this cake you will need one rectangular 9" x 13" pan (box #1) and two 9" round cake pans (box #2 divided evenly), and be sure that the pans are greased well, as it will help to get the cakes out later in one piece.

We will skip ahead, as you all should know how to mix cake batter! Here are the cakes when fully cooked:


Make sure the cakes are cooled completely. I actually stuck the pans in the fridge for about 20-30 minutes to cool them down faster.

Next, get a large sturdy platter out that you will serve the cake on. It is easiest to use this from the beginning, because once you start stacking the cakes, it will be nearly impossible to move otherwise.  Since I was a little unprepared for this, I ended up using a disposable foil pan that I couldn't really dress up in the end. I would recommend getting a clear or blue platter that will hold a 9"x13" cake without spilling over the edges.

Carefully cut around the edges of the 9"x13" cake, and invert the cake pan on top of platter. The cake should come out smoothly.


Next, I could have freehanded the fish shape cut, but I decided to be extra careful, since this was the base and foundation of the whole cake. I took a large piece of paper I had in my craft drawer, and cut a circle for the head and a tail. The circle size was actually traced from the bottom of one of the round cake pans, so that when you stack them, the cakes making up the head will all be about the same size.  I drew in the black lines on the photo where I would cut around the paper so you can envision it:


And here is after the cuts:


Be sure to try to keep the left over pieces whole, as we will be using some of these later. No eating cake bits until the end!!!


Here is how the base looks without the template.


Next, get out one can of frosting. I don't really care for icing unless it is Cream Cheese flavored. I bought 3 cans of the whipped cream cheese, as I knew I would be doing multiple layers of frosting and wanted things thin and creamy. You will need at least 3 cans. One is used to "glue" the cake pieces together, and two more for the decorative frosting once the cake is molded.

Using a flat spatula or knife, spread a thin layer of frosting on the "head" of the whale. Don't worry about it being perfect, as you won't see it later! It should look like this:


Next, take one of the round cake pans and cut around the edges before turning it upside down on top of the frosting.


Repeat the frosting again on this layer in order to prep for the third layer of the "head".


With your last round cake pan, cut the cake in half, and place one half on the front part of the "head" and frosting. I realize that this photo does not look like it is half of the pan because I took it at an angle, but trust me on this one! You will see below that it is half of layer #2.


With the remaining half, cut about 2/3 of it for the back part of the "head". The long sliver from the middle will be used for the tail later.


Add the smaller half circle to the back of the "head". I have also photoshopped a line where I trimmed off the back edge of layer #2 to stack to finish layer #3.
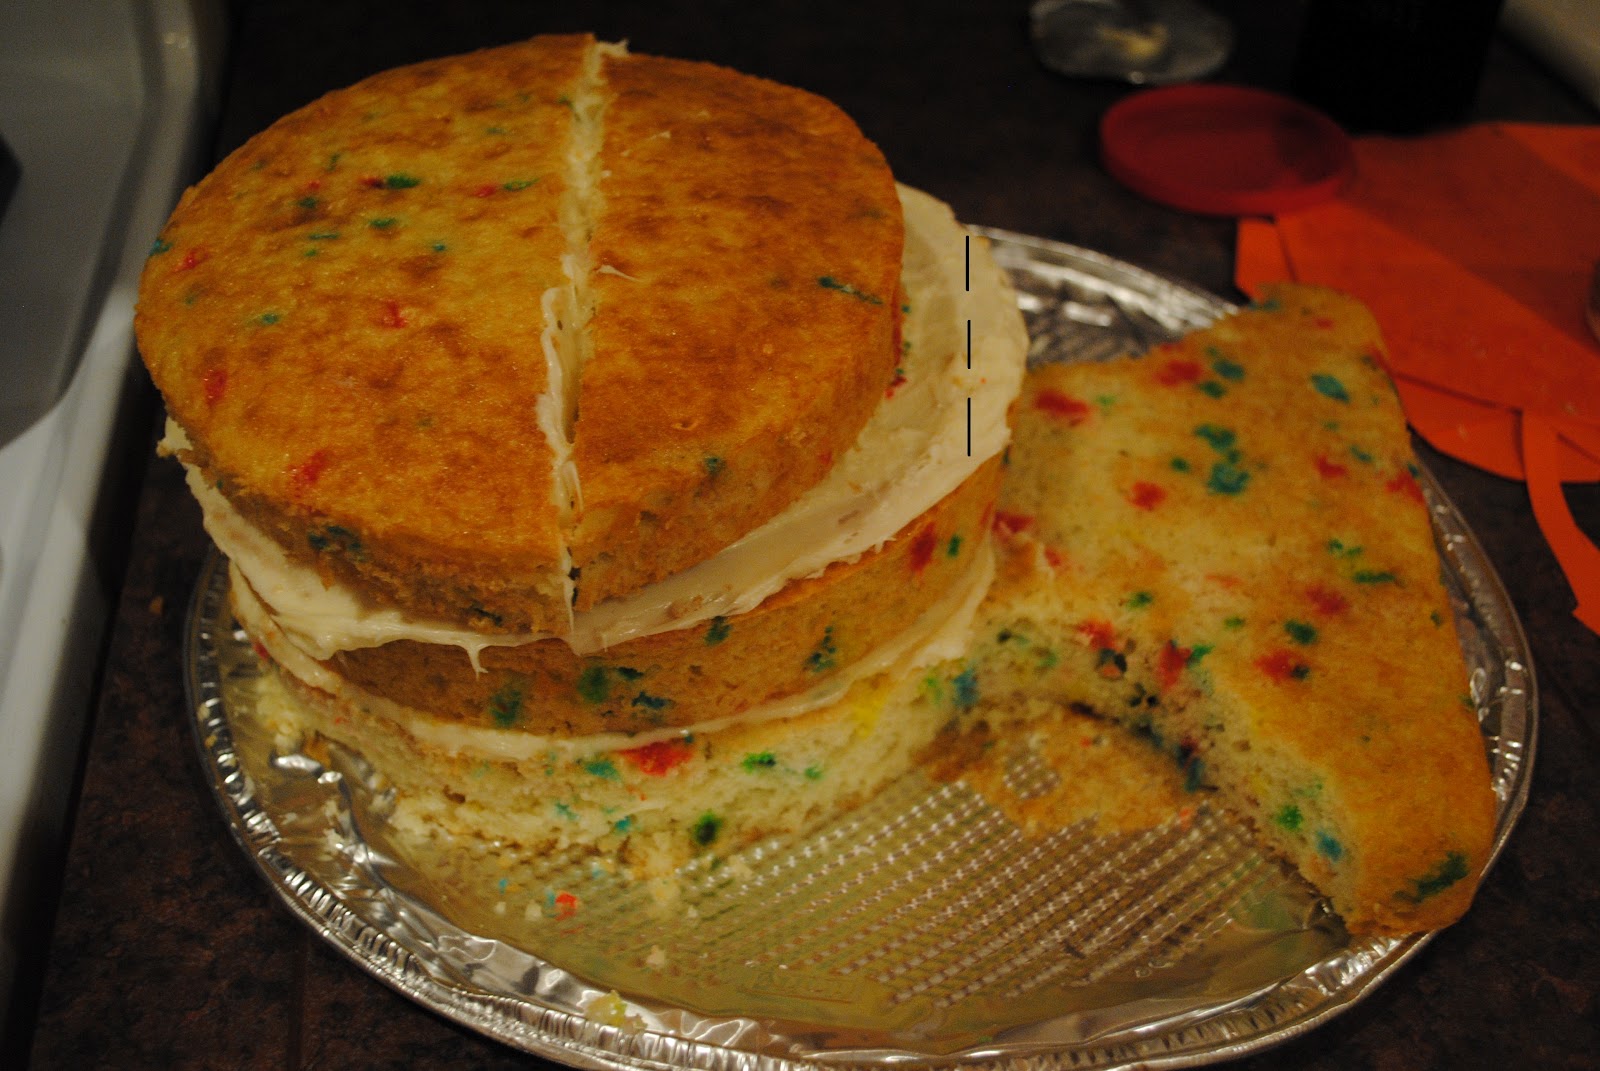

You will see below that the small edge has been "glued" to layer #3 with some more frosting. This is to help round out the shape of the head later.


I also cut a triangle from the back portion of the "tail" and inverted it onto the now straight-edge of layer #2, and "glued" with frosting.


Now, remember those leftover pieces we still have? We are going to use them to shape the tail. I have labeled them for your convenience.


And here is where they go on the back of the tail. Be sure to frost the bottom layer first, then place frosting between each piece as you "glue" them together.


Here is another view after I have fit them all together:


You have now finished the cake portion of the project! I popped him into the fridge to cool down, so that the pieces wouldn't slide around when they were frosted later. I would say a good hour is perfect.


Next, put the remaining frosting in a bowl, and using blue food coloring, add drops until you reach your desired color. I believe for both cans of frosting, I used about 30 drops for each.


Stir well to make sure there are no swirls!


Before you frost the cake, trim the layers vertically so that they are all even. These trimmings you can eat! You just want to shape the cake into a smooth shape.


Finally, using a smooth knife or spatula, spread a thin layer of frosting on the entire body. Don't worry if some cake pieces flake into the frosting, or you don't cover all the little spots. You will be using a thin layer of frosting 1-2 more times after the base coat.


Put the cake back into the fridge for about an hour so that the frosting can set. Repeat this step until you have a fairly smooth finish, and all spots are covered well. Remember to refrigerate in between layers. I actually left the initial frosting layer in overnight, and did the other two the next morning.

Then, I used black tubed icing to add some detail work. I added some lines to give the tail shape, and a smile to make him look cheery. The eyes are candied eyeballs that I used at Halloween here.


Lastly, add some blue twizzlers. I actually found these blue raspberry ones at Fresh Market. Just stick a few into the center of the head, and you now have yourself a whale! How cute is he?!


He also made a great centerpiece for our Under the Sea table. Good luck to anyone who tries to replicate this, and please let me know if you have any questions!!! You can e-mail me at foreverthehostess@gmail.com.


I hated to cut into him, but he was the most delicious Funfetti cake I have ever had! Remember, there are a few layers of frosting in between layers, so he was nice and moist, sweet and delicious!!! Thanks, Wally, for sprucing up our party!

Tuesday, February 7, 2012

Jellyfish Chandelier

I saw this chandelier on Pinterest and knew it would be perfect for our Under The Sea baby shower, I just had to figure out how to make it myself.

After a trip to Michaels, I found a bunch of wire ribbon in their $1 ribbon bins that were pretty colors of the ocean. I picked greens, light blues, a few lavender, and some deep ocean blue glittery spools.

Since each spool was 3 yards, I cut them to lengths of 1 yard long (3 ribbons per spool), 9 inches (4 per spool), and 6 inches (6 per spool). I liked the varied lengths, and tried to alternate colors and lengths to keep things more interesting.
You can see in this photo, I just tied each piece of ribbon in different places along the chandelier arms with a simple knot.


After tying your ribbons on, simply scrunch up the ribbon in your hand. I did a messy accordion fold all the way up to the knot. Hold for a few seconds, so that the warmth from your hand can set the ribbon.
 

Release. With the wire in the ribbon, it should stay and look like this:


Next, grab the bottom of the ribbon, and gently pull downward, until you get the ribbon to the length and kinks you desire. You can always adjust a little bit. 


And here is how it looks with all the ribbons completed. Forgive the dark photo, it was late at night when I was decorating! One last step left... the jellyfish body.


I hunted around for rice paper, as they originally used for this chandelier, but there was just no way to make it work around my ancient fixture. So I thought of the next best thing... tulle. I bought 2 spools of 12" x 25 foot long tulle, also at Michaels, found in the wedding supply aisle for $2.99/spool. I actually ended up only using one spool for the whole light, because I liked the translucency of it.

I just took the spool and tied the first end to the top of the chandelier. Then I wrapped the whole chandelier a few times, being sure to get even coverage. Then I tucked the other end into the top of the chandelier, so that I would know where it would be when I wanted to remove it.

Here is how it looked with the lights on:


I actually was fearful that the tulle would melt or burn by leaving the lights on, so since we have a ton of natural light in our dining room, it worked out perfect as just a cool centerpiece with the lights off. In the original chandelier inspiration photo., they actually have shades over the bulbs, all of which were covered with the rice paper. This allows them to keep the lights on without becoming flammable! But mine was pretty enough without being lit.


I was really happy with how it turned out and how easy it was to create! Stay tuned for one of my longest posts on how to make the other star, Wally the Whale cake, later in the week!

Thursday, January 19, 2012

Hostess Tip #9 - Making A Good Salad

Often when friends get together, I offer to bring a dish. I consider myself a pretty decent cook, so for a long time, I would oblige (but not be flattered) when someone asked me to bring a salad instead of some fabulous side item. However, after many years I have come to realize that I am a pretty darn good salad maker, and people ask me to bring a salad so that they don't just have lettuce and a bottle of pre-made dressing for guests. Hostess Tip #9 - Learn to make your own amazing salad.


Making good salads are pretty simple with these two steps. First: Use fresh ingredients, and stick with the ones you love. My go to ingredients are:

Romaine lettuce/bagged spring mix
Fresh sliced tomatoes
Black olives
Red or green or yellow peppers, sliced
Red onions
Reduced fat/fat free feta cheese(could also swap for shredded Parmesan cheese) 

And the second step is this: make your own salad dressing. Even if you are in a pinch and can't use fresh ingredients, and just buy a bag of mixed greens with carrots and veggies in it, a homemade salad dressing makes it a better salad. And there are only four ingredients you need for any salad dressing:

Olive oil
Vinegar (red wine, white wine, or balsamic are my staples)
Salt (I usually use garlic salt)
Pepper

The key to a good salad dressing is proportion between the ingredients. The salt and pepper is used to enhance the natural flavors of the fresh vegetables. The ratio of oil and vinegar is really more of a personal preference.... start with 1/2 cup of olive oil and 1/8-1/4 cup of vinegar. If you like your salad to have a bite, use 1/4 cup of vinegar. If you want it more mild, only use 1/8 cup. I make salads so often now that I just swirl them both over the lettuce in the bowl and don't measure. It just takes practice in knowing the ratio you like best.

Need a little more flavor in your dressing? A bonus step: Add herbs and spices from your kitchen. Basil is standard in Italian dressings, oregano is standard in Greek dressings. If you are doing a southwest salad, add a little cilantro and cayenne pepper (just a dash) for some good flavor. I also love earthy spices like rosemary and sage when using the heavier balsamic vinegar. Simply add a sprinkle or two of your favorite herbs to the top of your salad before tossing. Their flavors will be enhanced with the blending of oil and vinegar.

Have any good salad dressing recipes or tips to share? Email me at foreverthehostess@gmail.com to submit, or check out my next post on the Best Of: Salad Dressings - all my favorite go-to recipes for that special occasion!

Friday, June 17, 2011

How To: Baby Shower Banners

As you remember from the Monkey Baby Shower, I recently made my first set of banner decorations. There are tons of people on Etsy who now make these flag banners, but it is so easy that anyone can do it. No sewing machine required, unless you want to keep them forever and ever. Here is my how-to for 3 banners:

What you will need:
-Ribbon, about 2 spools or 6 yards
-4 Fabric Quarters
-Iron on Hem Tape
-Iron
-Fabric Scissors

First, I went to Michaels and purchased a couple spools of brown & white polka dot ribbon to use on the vases and other decor for the party. With the two leftover spools, I used the ribbon for the top "string" of the banners. I already had some Hem 'N Bond at my house, so I used that to hold everything together.

I also went to Joann's and purchased a few "Fabric Quarters" in coordinating colors. These are the perfect amount of material, and only cost $1.50 each! I took the cardboard out of one of the fabrics and cut a simple equilateral triangle. I just eyeballed it, no measuring necessary, unless you are really anal about it.

Next, I simply doubled the fabric and laid it out on the table, so that I could cut twice as many triangles at a time.I placed the cardboard triangle in the corner, and simply cut along the edge. The thickness of the cardboard serves as a good guide, and a sharp pair of fabric scissors also help a lot.


As you can see from the above photo, it actually was the perfect size triangle because it fit evenly going across the fabric. I did not have any leftover fabric! Continue this until the desired number of triangles are cut. I believe I cut around 30 of each, and I probably used about 20 of each.  At the end, you will have a ton of little triangles:


Notice I also did not iron the fabric before I cut- oops!! Usually this would be good to do, but I cut them pretty evenly, and the polished cotton I was using does not have any stretch, which would cause them to be different sizes after cutting. I just figured I would do all the ironing at once.

Set your iron for Medium heat, or according to the instructions to the Heat 'N Bond. I have the multi-pack, so it had a thin tape that was smaller than the ribbon. 
I pre-cut the ribbon in desired lengths by first stringing them up on the doors and walls where they would go for the party. Then, I laid the ribbon, polka dot side down, on the ironing board and placed the hem tape on the back of it. The tape is double sided, so DO NOT IRON the hem tape to the ribbon without the triangles on. It will burn the iron and melt the tape.


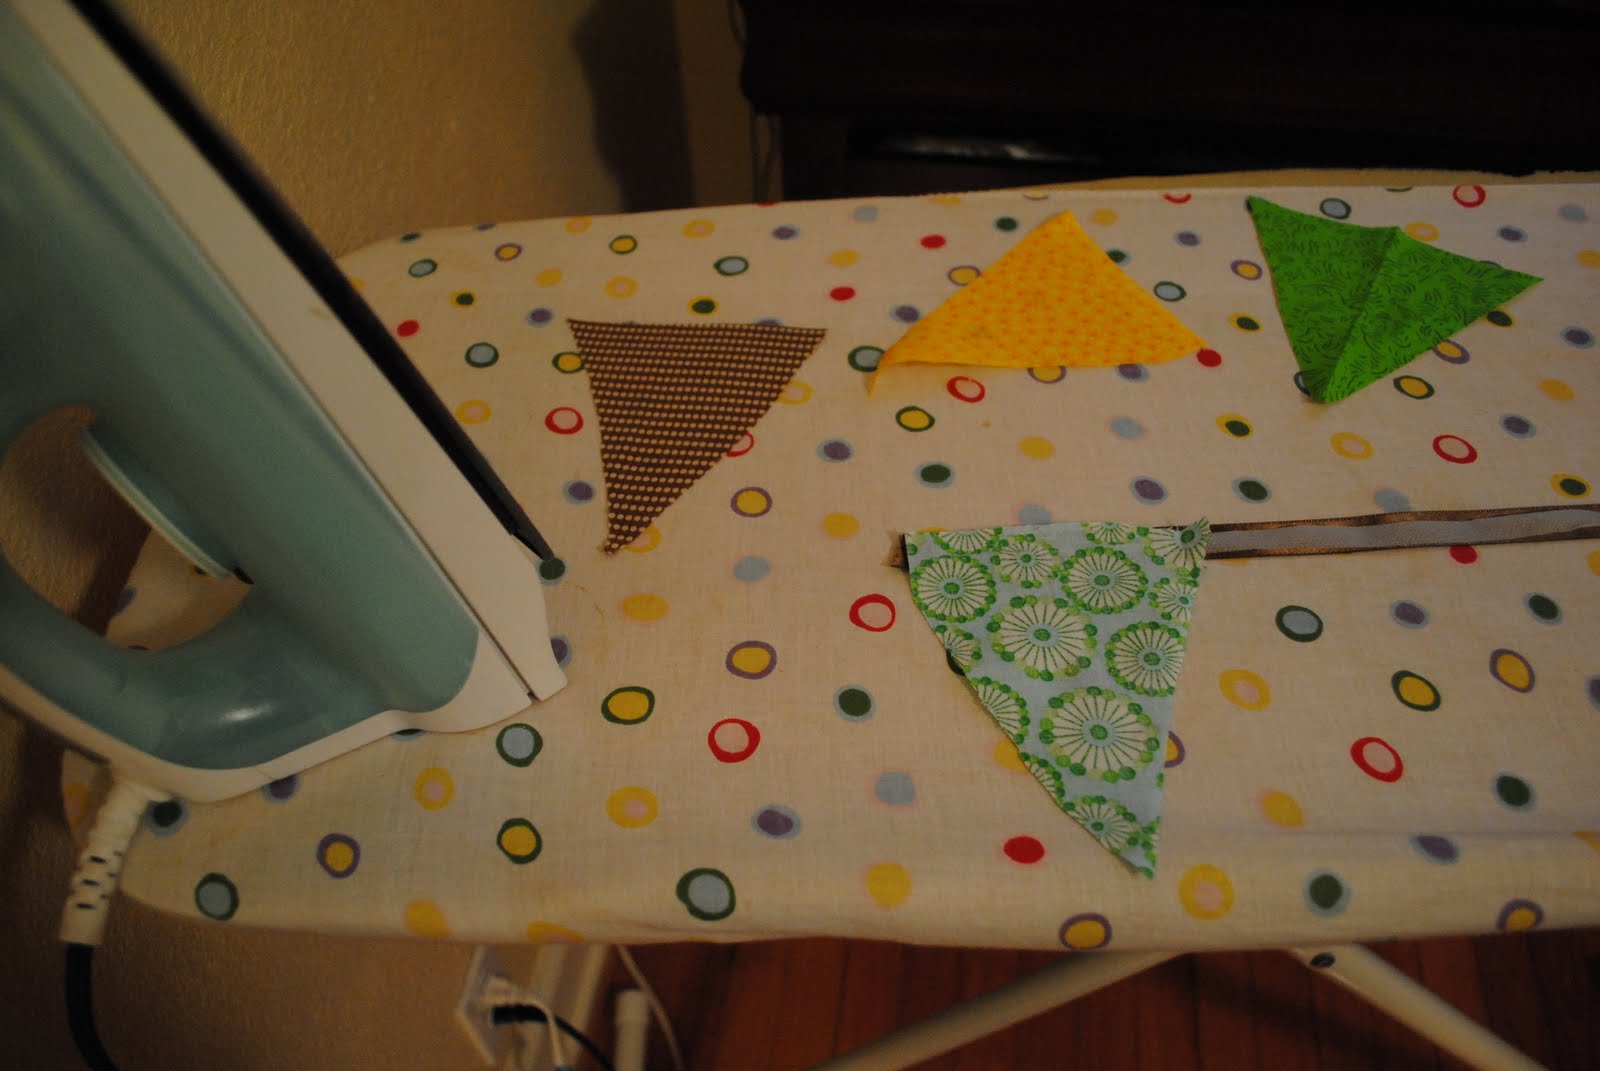
At this point, before I ironed the hem tape, I quickly ran over the triangles with the iron. (please forgive the dark pictures, as it was 9PM and I didn't feel like adding light just to make the photo better).


After the triangles are individually ironed, take one and starting at one end of the ribbon, place the triangle, pattern side down, along the edge.


Continue to put the triangles along the ribbon, with the hem tape between, alternating colors. Since I had 4 patterns, I would iron after laying out those 4 triangles. 
 Place the iron on each triangle edge for about 10 seconds, or according to the Hem Tape packaging. Be sure to not touch the iron to the hem tape where you have yet to place triangles, as it will melt and you will need a new piece of hem tape.


Continue this until you get to the end of your ribbon piece. If you have a little leftover ribbon at the end, and not enough room for a triangle, simply trim the ribbon. Voila! You have made a banner. Here is a look at mine again (in the living room and in the dining room):


And in the living room (again). They are not perfect, but they literally took me an hour and a half to make all 3. The cutting of the triangles took the most time, and putting it all together is easy peasy.


If you want to get really fancy, you could make them double sided, or actually sew them. But I wanted to keep things quick and simple, and guests didn't really inspect them anyway. I will definitely be using this decor for a party again soon!

SHOP