Showing posts with label DIY. Show all posts

Friday, April 13, 2012

Pinterest Challenge - Silver Framed Chalkboard

I try my hardest not to go on Pinterest every day, but it is really difficult when you are looking for a gift or design idea, and need a little inspiration. With the baby showers that my friends have graciously given me, I was in need of some different and inexpensive ideas for hostess gifts. One happened to be a Pinterest idea:


Cute and easy, right? Kind of. I did make some with success, but this tutorial shows that it isn't as quick as you would think.

First, I purchased some old silver trays at Salvation Army for $2 each. They were in good shape and just needed some polishing. But don't polish them before you start this process, as you may end up getting them dirty and smudgy.


Forgive the lighting in these photos, apparently the only time I have to do projects these days is at night when the lighting is horrible. 

I purchased some Con-Tact Chalkboard paper on Amazon to use for this project. After reading many how-to's online, some of the projects that used the chalkboard paint were a little streaked or required multiple coats, which I did not have time for. Also, our local Michaels was out of the chalkboard acrylic paint, and I can not use the spray paint (aerosol/fumes+ baby = no-no). But this stuff was fairly easy to use, and I love the finish it provides.

But there is one step to do before you get it looking pretty, which may require the help of a man and his drill (or a skilled Father-in-law who had it done in 10 minutes). See these little holes where you later tie your ribbons?


You need to drill them into your platters. And since we needed someone to hold the platter and someone to drill accurately, we had no hands left to hold a camera and take photos. So try to follow these directions to make the holes:

First, mark on the plate with permanent marker where you would like the two holes. These marks will go away once you drill. Second, get a large heavy-duty nail or screw and a heavy hammer. While one person holds the platter steady, the other should try to hammer the screw/nail into the plate to puncture the metal. It does not have to go all the way through, it just has to puncture the metal. This makes the drill bit go in easier. Next, use a 1/4" drill bit (or larger), and make sure it is for metal and not wood. Start the tip of the drill bit in the puncture and drill until you have a round hole all the way through the platter. Repeat on the other hole. To finish off, use a metal file to file down any sharp edges around the holes, as they will snag your satin ribbon later if you don't!


 I first cut a square piece of the Con-Tact paper to fit over the area in the middle of the platter. I taped a few sides taught before I began cutting the round edges with scissors.


Just insert your sharp scissors and run them around the inner edge of the platter.  

This wasn't the most conventional way to do it, but on this platter, it seemed like the easiest way to get the shape right.... or close.


 Here is the finished cut (above) and flipped (below).


Ok, so maybe my scissors weren't sharp enough, or it was just an overall bad idea to do it that way. The edges look ROUGH. 


I just took my scissors and gently went around the circle to make nice clean edges. Luckily, I could do this free-handed and it didn't make too much difference on how the chalkboard fit onto the platter. 


Here is how I would recommend doing it in the future, as I did with the other platters that had a more unusual shape. I placed the Con-Tact paper over the platter, and taped it to secure. I then took a marker and traced the inner edge of the platter, then removed the Con-Tact paper and cut along the tracing. It ended fitting perfectly with clean edges.


The next steps are probably the hardest. Remove a small section of the Con-Tact paper to expose the sticky side. Place the contact paper, sticky side down, on your platter, and as you smooth with one hand, pull the white backing underneath with the other hand, until the entire piece is stuck down.


I also found that using a credit or membership card as I went along helped smooth any bubbles. I ended up with some tiny bubbles or marks, just because the silver wasn't completely smooth on the surface.  But for the most part, it looked great.


It was at this time that I took a silver polish cloth to the platters to shine them up and get rid of any finger prints and tarnish. If the platters need a good deep clean, I would clean them with a rag and silver polish 1-2 days beforehand to make sure they dry well before you apply the chalkboard. 

Next, I decided that I wanted my platters to have the ability to be hung, rather than just put on a shelf. I took satin ribbon cut into two almost 2' long strips. The first strip is fed through each hole from front to back. Then about 6" above the top of the platter, I made a knot, and then over that tied a bow. Repeat the process, feeding the second ribbon from the back of the platter through the outside edges of the holes (so the top ribbon is on the inside edges of the holes). Tie in a knot and then in a bow at the top of the platter.

I use the bunny-ear method to tie my bows. I saw years ago that Martha Stewart thinks this makes the best bows. Frankly, its how I learned to tie my shoes, and have tied bows this way ever since!

Next, I cut the tails on the bows with some scissors, keeping the tails shorter for the bow at the top of the platter, and longer on the piece that actually hangs the platter. 

For the final touch, I took some chalk and wrote messages on the chalkboards. With each chalkboard, I included pieces of chalk tied with more of the satin ribbon. I really loved how they turned out, and I actually have some leftover Con-Tact paper, so I may just have to make myself one soon!


Thursday, January 5, 2012

2012 Decor

There is something about Christmas decor that makes me really warm and cheery. Having to take it down is really depressing for me every year, so when I do get to it New Years Day, I also try to substitute some sparkly decor for the New Year and our January wedding anniversary, just to liven my spirits. 

Using items I had around the house, I  came up with these small but happy additions:

This one is not really an addition, but rather a subtraction. I just took off the red table cloth, but left the Candlewick and dollar store gold and silver ornaments. See the Christmas theme here


Next, in our living room, I pulled out the teal vases, as well as some dollar store ornaments, and glittery garland to make a festive centerpiece in my vintage brass tray on the coffee table.


I added two bouquets of fresh flowers for $10 from the grocery store. I wanted all white flowers, but they mostly had Christmas bouquets left, so I will get white flowers when these die in a week.


Outside, I put up our Happy New Year flag that I bought last year at a garage sale for $3. I actually bought a couple of flags for different occasions, all around $2-$3 each. Normally in stores, giant flags are around $20-$25, which is why I look at garage sales for good ones on the cheap.


I also put back up my all-occasion wreath, that we also got at a church flea market for $1. I decorate it throughout the year with different bows, or props for certain party decor (remember the hatch?). With some glittery wire ribbon and a leftover ornament from a Christmas gift, I created a giant bow with a little finesse. I actually really loves how it sparkles, and color coordinates with both the flag and indoor table decorations!


Do you decorate for the New Year?

Thursday, December 29, 2011

More Reindeer...

My mom and I certainly think alike! For Christmas eve dinner, my mom decorated her dining room table with a Reindeer theme! And at each seat, she had some of these for us to wear, along with this take-home sweet surprise:


Materials:
Reindeer Peeps
Bob's Mini Candy Canes (Bob's are the BEST!)
Plastic treat bags
Ribbon
Clear Tape
Mini Silver disks (optional)

My mom wanted to give them more pronounced antlers, since their given ones look like ears (and reindeer have both). So she placed the two candy canes on the mini silver disks and used tape to secure them. You can see the tape in these photos due to the flash, but in person, it was hard to see. Then simply place the reindeer Peep on top and place in the bag. Tie with a festive ribbon, and pass out to family and friends!

My mom didn't want the candy canes to get gooey, so she left them in the wrappers. However, if you are going to give to guests right away, I would take the candy canes out of the wrappers and stick them into the back of the Peep, no tape necessary! Too cute!


Monday, December 12, 2011

Homemade Gifts To Warm The Heart

Every year, I hand make some gifts for a few girlfriends that I have known for many, may years. I wish every year I could buy them awesome, individual gifts, but it is just easier to make them something with some of my time and love.

As you may remember, last year I made these sequin earrings and in 2009, I made this rosemary sea salt. This year, I decided to try a recipe that I have eyed for a few years from Martha Stewart: Peppermint Marshmallows, paired with some Swiss Miss hot chocolate.

Here's what I started with for the hot chocolate:

- 3 boxes of Swiss Miss Classic Milk Chocolate Hot Chocolate (it is the best, so why try to make your own?!)
- Glass jars - I bought 3 Four packs (12 total) of the Rajtan from Ikea for $12. I love that they have screw tops too!
- Raffia to tie on the gift tags (already owned)
- Gift Tags (business card sized) I made on Microsoft Publisher


 Here are the gift tags up close:


I used 3 packets of Swiss Miss per jar, although I could have probably fit 4 packets... I just ran out of mix!


And here are the jars after a little embellishment:


Next came time to make the marshmallows, which I had never done before. A word of warning.... read all the comments under Martha's recipe, because I ended up needing some of these tips. I didn't take any in-the-making pictures because I was too worried about making them right, but they came out just as they said they would, so I was happy. So I cut them up and got them ready for packaging.


But here is the finished product, placed in little bags made by, who else? Martha Stewart.


Quite a sweet gift... I just love them! What is left to check off on your holiday to-do list?

Friday, June 17, 2011

How To: Baby Shower Banners

As you remember from the Monkey Baby Shower, I recently made my first set of banner decorations. There are tons of people on Etsy who now make these flag banners, but it is so easy that anyone can do it. No sewing machine required, unless you want to keep them forever and ever. Here is my how-to for 3 banners:

What you will need:
-Ribbon, about 2 spools or 6 yards
-4 Fabric Quarters
-Iron on Hem Tape
-Iron
-Fabric Scissors

First, I went to Michaels and purchased a couple spools of brown & white polka dot ribbon to use on the vases and other decor for the party. With the two leftover spools, I used the ribbon for the top "string" of the banners. I already had some Hem 'N Bond at my house, so I used that to hold everything together.

I also went to Joann's and purchased a few "Fabric Quarters" in coordinating colors. These are the perfect amount of material, and only cost $1.50 each! I took the cardboard out of one of the fabrics and cut a simple equilateral triangle. I just eyeballed it, no measuring necessary, unless you are really anal about it.

Next, I simply doubled the fabric and laid it out on the table, so that I could cut twice as many triangles at a time.I placed the cardboard triangle in the corner, and simply cut along the edge. The thickness of the cardboard serves as a good guide, and a sharp pair of fabric scissors also help a lot.


As you can see from the above photo, it actually was the perfect size triangle because it fit evenly going across the fabric. I did not have any leftover fabric! Continue this until the desired number of triangles are cut. I believe I cut around 30 of each, and I probably used about 20 of each.  At the end, you will have a ton of little triangles:


Notice I also did not iron the fabric before I cut- oops!! Usually this would be good to do, but I cut them pretty evenly, and the polished cotton I was using does not have any stretch, which would cause them to be different sizes after cutting. I just figured I would do all the ironing at once.

Set your iron for Medium heat, or according to the instructions to the Heat 'N Bond. I have the multi-pack, so it had a thin tape that was smaller than the ribbon. 
I pre-cut the ribbon in desired lengths by first stringing them up on the doors and walls where they would go for the party. Then, I laid the ribbon, polka dot side down, on the ironing board and placed the hem tape on the back of it. The tape is double sided, so DO NOT IRON the hem tape to the ribbon without the triangles on. It will burn the iron and melt the tape.


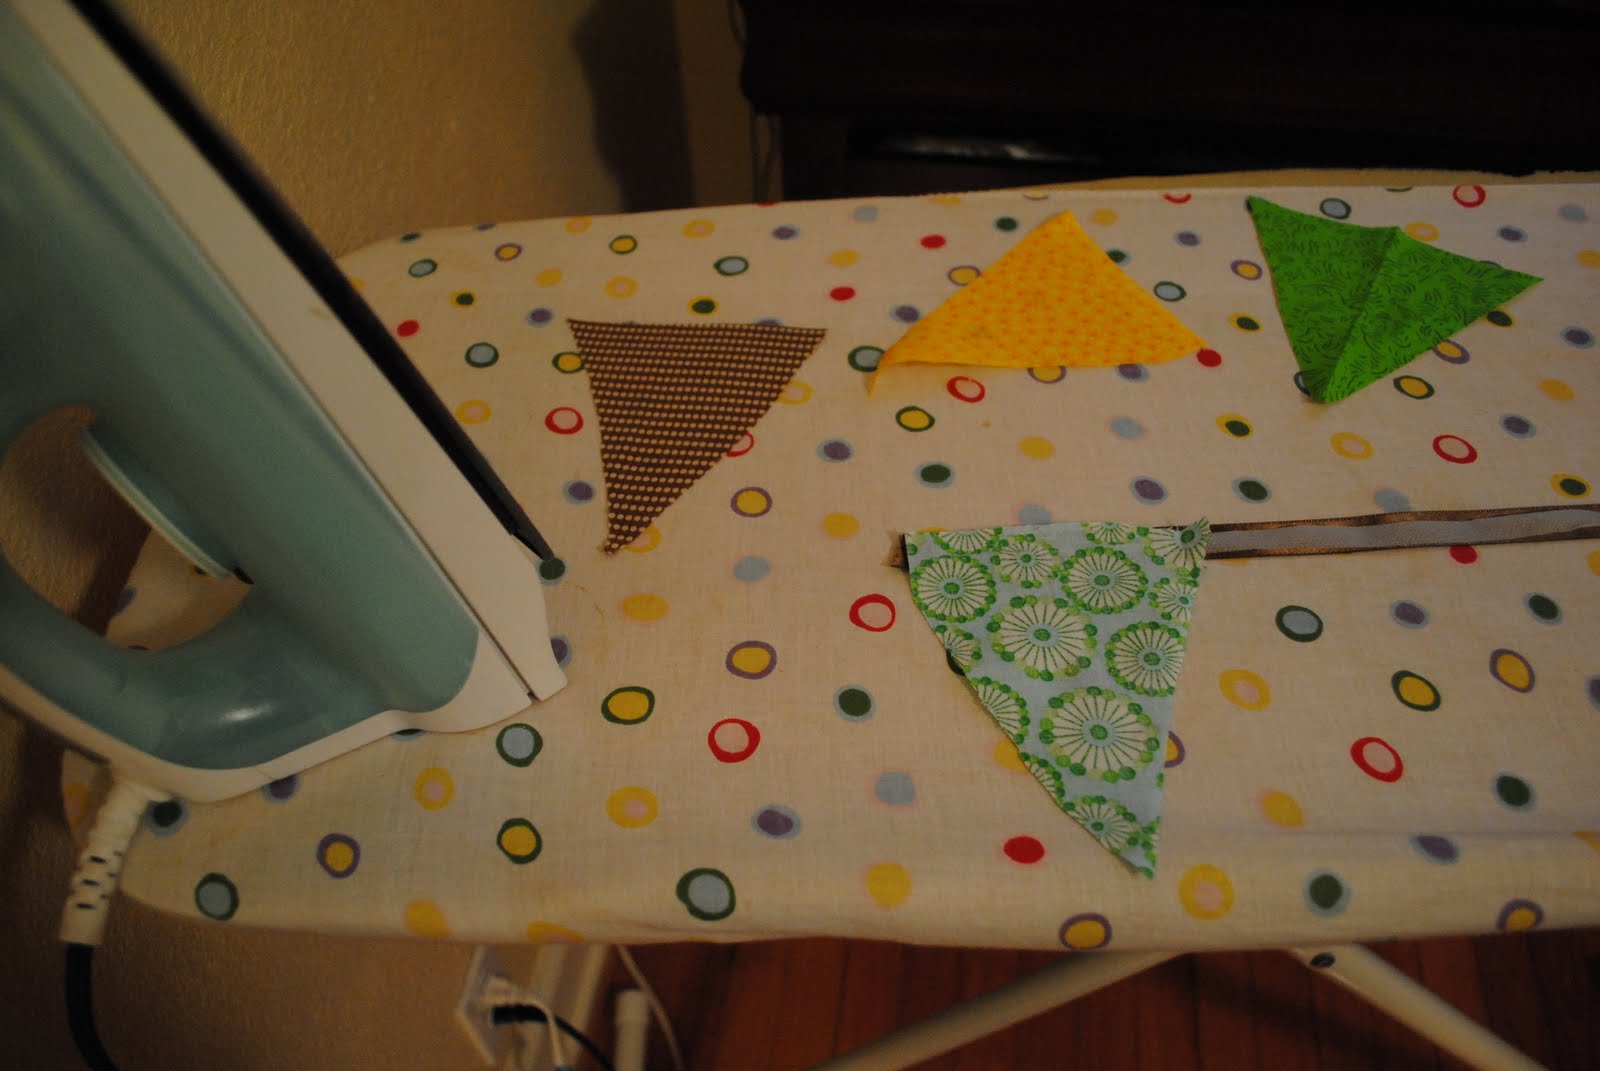
At this point, before I ironed the hem tape, I quickly ran over the triangles with the iron. (please forgive the dark pictures, as it was 9PM and I didn't feel like adding light just to make the photo better).


After the triangles are individually ironed, take one and starting at one end of the ribbon, place the triangle, pattern side down, along the edge.


Continue to put the triangles along the ribbon, with the hem tape between, alternating colors. Since I had 4 patterns, I would iron after laying out those 4 triangles. 
 Place the iron on each triangle edge for about 10 seconds, or according to the Hem Tape packaging. Be sure to not touch the iron to the hem tape where you have yet to place triangles, as it will melt and you will need a new piece of hem tape.


Continue this until you get to the end of your ribbon piece. If you have a little leftover ribbon at the end, and not enough room for a triangle, simply trim the ribbon. Voila! You have made a banner. Here is a look at mine again (in the living room and in the dining room):


And in the living room (again). They are not perfect, but they literally took me an hour and a half to make all 3. The cutting of the triangles took the most time, and putting it all together is easy peasy.


If you want to get really fancy, you could make them double sided, or actually sew them. But I wanted to keep things quick and simple, and guests didn't really inspect them anyway. I will definitely be using this decor for a party again soon!

Thursday, April 14, 2011

Refrigerator Update and Hostess Tip #6

Let's begin at the end-

Hostess Tip #6:
Never leave canned sodas (or carbonated drinks) in a new fridge if you are still unsure about the temperature setting. They could freeze and explode. All.over.the.new.clean.fridge.

And now to the beginning:
If you weren't getting a few laughs from the last post about setting up our new fridge, maybe you can from the fact that we had another issue with it last night. When I organized it, I happened to put the Diet Dr. Pepper soda cans at the top, since we drink them occasionally on the weekends, and I like mine pretty cold. I'm sure you can imagine what happens next, but let me clarify first. This was not the first time that a can has exploded on me, so I cautiously checked them on Tuesday night to make sure they were not frozen. I honestly did not think the fridge was as cold as our last one, so I thought they would be fine to leave them up there for another day and check them later.


Last night, we went to dinner at the in-laws house, so I didn't open our fridge until I was going to bed at 10PM to get some water. When I did, this is what shot out at me:


It was a DDP rocket!!! Seriously, there was this loud pop as I opened the door and  I instinctively curled into a ball on the floor with my arms curled around my head. There must have been some pressure built up in the fridge because it literally exploded open when I pulled on it, and a mangled DDP can with frozen soda still in it landed at my feet. After realizing what had just happened, I stood up from my duck & cover position to find that the entire inside of the clean new fridge had been covered in frozen brown soda. Another mangled can lay on its side still on the top shelf (the first casualty) and a third can lie in wait. I immediately removed the third can and put it in the sink to thaw out, while secretly praying that it too not explode all over my kitchen.

What is really fun about cleaning up after a frozen soda, is that while you are busy pulling out food and removing every shelf of your new refrigerator, the iced pieces of soda begin to melt, since the temperature is rising with the door open. This makes for more of a mess... think slushy. So basically, I cleaned the entire inside of the new refrigerator again last night.

And our ice maker still does not work.  The saga continues....

Monday, March 7, 2011

New Living Room

I m helping my brother-in-law redesign his condo. After a few weekends of searching for the perfect couch, we found the following at Hudson's Furniture:
It has a great twill fabric and we chose some custom fabric for the pillows. I then used the pillow fabric as inspiration for the room, and built a board around it:

Since he is single, we are trying to keep the elements soft but a little masculine, since this is a bachelor pad. I love the oversized, industrial look of the coffee table, and its lower drawers provide some storage in addition to the open shelf. He wants a brown leather streamlined recliner to compliment the couch and loveseat. We are also working in some green plants (most likely good fakes) to bring a little more color and warmth to the beige space, and some large abstract artwork, rug, and cool lighting for decoration. Also, rattan storage ottomans can not only hide the PlayStation controllers and games, but provide extra seating for game nights as well.

I am still working on elements for the dining room/entertainment area. We have a vintage bar cabinet that I may repaint, as well as updating the current seats on the dining room chairs. More on this area as it progresses, but I am so excited about where the room is headed!

Monday, December 20, 2010

DIY: Sequin Ball Earrings

A frequent visitor to the Martha Stewart site, I always look at her homemade gift ideas for the holidays. I always have a DIY party favor for guests at an annual dinner with some girl friends. I loved her Sequin Ball Earrings (at right), but after reading the directions, it seemed a bit difficult with the whole chain drop and making the sequin ball.

However, after perusing Pier 1 for another gift, I came across these Sequin Spheres for $5 a box! I loved that they came in three festive colors, and that there were 30 balls in the box, which could make 15 pairs of earrings.  This was one easy solution to the problems I had with Martha's how-to! So off to the craft store for the rest of the supplies needed to make the earrings.


I purchased gold plated hooks and gold head pins to feed through the balls and attach to the earring hooks. I also used jewelry pliers that I already owned to help bend the wires. I think the entire project cost me under $10. Here is the step by step how-to make the sequin ball earrings:


Step 1:
Set out your supplies by pair, so you make sure you have enough of each. You need two sequin balls, two hooks, and two head pins.
Step 2:
Feed one head pin through the sequin ball. The middle of the ball is styrofoam, so it it easy to press the pin through. Try not to force it, as the pin bends easily and you want to keep it as straight as possible before the next steps.

Step 3:
Push the head pin all the way through the ball until the head is flush with the bottom. Be sure not to push too hard that the head actually goes into the ball. You want it to remain outside of the sequins.

It should look like this when you have it through.
Step 4:
Feed the hook onto the head pin.
Step 5:
Clamp the hook and head pin with one set of pliers and hold in place while performing Step 6, below.

Step 6:
With a second set of pliers, grab the end of the head pin and bend it in half to form a loop. Obviously, I could not take a picture of the pliers bending the wire, as I needed both hands, so here is what it should look like after you bend it. 

Step 7:
Continue to use both sets of pliers to bend the pin around the stem of the loop to secure it in place, until the entire pin is curled around the loop.
Step 8:
Repeat all steps above for second earring. Voila! You have a pair!
I really love how they came out and in such festive colors. I wrapped them up in little boxes and randomly set them at each place setting. It was fun to see which guest got what color! And I kept a gold pair for myself that I will be wearing year round for that party perfect sparkle!

SHOP