Tuesday, May 29, 2012

Baby Ready?!

Baby D will be here in a matter of days, and I have been slacking a bit on normal blog activities to prepare for her arrival. While all the books and websites tell you to relax, get plenty of rest, and enjoy these last moments until your newborn arrives, I am lucky to have friends who really help put things in realistic perspective for me. I was passed along the article You're So Not Almost Ready For A Baby, Even If You Think You Are by Tracy Moore as a guide to what I should be doing these last couple of days. Be sure to check out the excerpt below, and the full article here

not Baby D, and I am praying she doesn't look like this too often!


I ... would come with the following drills/regimen for the entire year prior to conception...:
  • Practice wrestling a large, slippery fish three times a week.
  • Wake up every two hours at night, punch yourself in the face, walk around for 28 minutes pleading in jibberish. Go back to "sleep." Repeat.
  • Socialize with friends in 18-second increments.
  • Practice asking for the check, boxing up your food and exiting a restaurant in under sixty seconds — two bites into the meal.
  • Watch 38% of any film or television show; never see the ending or resolution.
  • Read the same three paragraphs of a novel once every two weeks; fall asleep.
  • Shower every three to five days, but only for two minutes.
  • Hire a makeup artist to make you up to look 10 years older. Look at yourself in the mirror, then laugh, cry, laugh, cry, laugh, cry. Do not go get a drink.
  • Pack two additional bags of random stuff to carry with you every time you leave the house.
  • Stand around a tennis court and catch fly balls with one hand for two hours a day while also preparing a peanut butter sandwich.
  • Practice wrestling aforementioned large, slippery fish, then dress it in seasonally appropriate outfit, including hat and/or jacket. Then go back, remove all clothing, and apply sunscreen. Re-dress fish.
  • Memorize The Cat in the Hat, then repeat every evening between 7 p.m. and 8 p.m.
  • Make 24 hours of baby-crying audio; hit play the moment you take a phone call, fire up your computer, or begin speaking any sentences to another human that contain important or useful information.
  • Imagine a mental written list of your responsibilities for each day, tear it in half, burn one piece, take a (literal) [poop] on the other one.  
So basically, we are in for the shock of our lives. If I disappear for two weeks (or more) you'll know that I have not mastered the above tasks/daily care for Baby D. Do you have any good last minute tips for this momma to be?  

Friday, May 25, 2012

The TuTu Project

In honor of the last day of a loved one's cancer treatments (Yippee!), I came across the Tutu Project and was reminded of how truly brave one can be after a cancer diagnosis. What is unusual about this is that it is not about the patient, but a loved one putting their face on cancer. The TuTu project started as photographer Bob Carey's dedication to make his wife smile through her cancer battles, and in the process, found that his efforts can also raise money for breast cancer research and finding a cure.

Check out some of his images below:


And here is the Tutu Project as featured on the Today show.

What is not to love about a man in a pink tutu?! He has a book titled Ballerina coming out in the fall with all of the images he has captured in the nine years his wife has been battling cancer. Proceeds of his book, and his photography, will all be donated to breast cancer organizations. Be sure to check out his mission and donate if you have the means to this great cause.

It takes a brave face to deal with cancer, but I only wish we all had a face brave enough to wear a tutu.

Thursday, May 24, 2012

Pillow Progress!

In just a few days, I found a pillow that works in Baby D's crib, as originally wanted in this list from the Nursery Reveal:

There are just a few details left I want to do to make it 100% complete:
-Find some artwork for over the twin bed
-Find a cute pillow for the crib (which I will take out when she sleeps so we don't give her any suffocation hazards - more on SIDS here)
-Frame some vintage photos of our parents and grandparents when they were children for the room


I have looked everywhere online and in stores for a pillow that matches the blue, green, and brown tones of the room and rug that we reused from our last guest room. And let me tell you, it is not easy to match tones of moss green, turquoise blue and medium brown! So after much frustration, I went back to Pier 1 where I originally bought the rug years ago. They just got in some new pillows, and I bought three different ones, hoping that one would match. We tried them all out, and added the green solid throw pillow from the twin bed and her Sleep Sheep, and the brown one looked best!


And a nursery bonus! My sweet husband surprised me with a new hippo addition to Baby D's nursery. There are lots of cool vintage hippos on Etsy, and she was my favorite! I named her Rosebud...


She is large and ceramic, and I absolutely love her!  I think I am going to give her a green bow instead of orange, so she matches the nursery a little better. I only hope Baby D loves her too!

Wednesday, May 23, 2012

As Orange As The Summer Sun


As part of BlogHer's Life Well lived series, I was asked to answer the question- What are your favorite summer staples? How do you bring the summer sun to your wardrobe? 

Since I am now 9 months pregnant, my wardrobe is limited to maxi dresses and lounge clothes. Ask my husband... he hates what I wear lately! If you see me in about a month, you will see me in short, brightly colored dresses and fun sandals, my usual summer staples.

There is one change that I have made in the past month. Usually, I am not one for painting my toenails with anything other than clear polish or a french pedicure. I think because I wear bright colored shoes in the summer, I don't want my toes to stick out or clash.

However, since a lot of my maternity wardrobe is classic black, I actually have been painting my toes a perfect shade of orange I recently found at Gap, of all places. The color's name is POPPY, which is exactly what it does to my toes... makes 'em pop! And it reminds me of a blazing summer sunset over the Gulf Of Mexico... hopefully I can get some pool time and sunsets in this weekend before Baby D arrives!.

Even though my toes are a little swollen in this picture, they're still rockin' the heels!
How do you incorporate the summer sun into your wardrobe? And what are your favorite summer staples? Go here to tell me, and enter to win an iPod Touch!

Monday, May 21, 2012

Nursery Reveal

I think I am 99.9% done with the nursery for Baby D, and have had multiple requests for photos. Since we are still living with the in-laws until we find a house of our own, we took over a small bedroom with no closet, but lots of natural light for Baby D's nursery. Even though Baby D is a girl, I kept things neutral using furniture and accents we already owned in green, turquoise and brown tones. Someday, when we buy a new house, her new nursery will be completely different, but I am really happy with the way things turned out for now.

Here is the nursery from the doorway:


Changing table, using an antique chest topped with a changing pad and necessities:


A closer view. The changing table pad is covered with a Cocalo cover, and we secured it to the back of the chest as directed with two screws. I picked up the green bin at Target (similar here) to hold the necessities for diaper changing- wipes, Butt Paste, and anti-bacterial gel. It matches other large bins we have for storage. And check out the cute mushroom night light that gives off the perfect glow for nighttime feedings and changings.


Inside the chest I have the top drawers organized with one with a linen caddy for more necessities...


And one full of diapers.


The second drawer is  for sleep sacks, swaddle blankets, changing pad covers, and miscellaneous items.


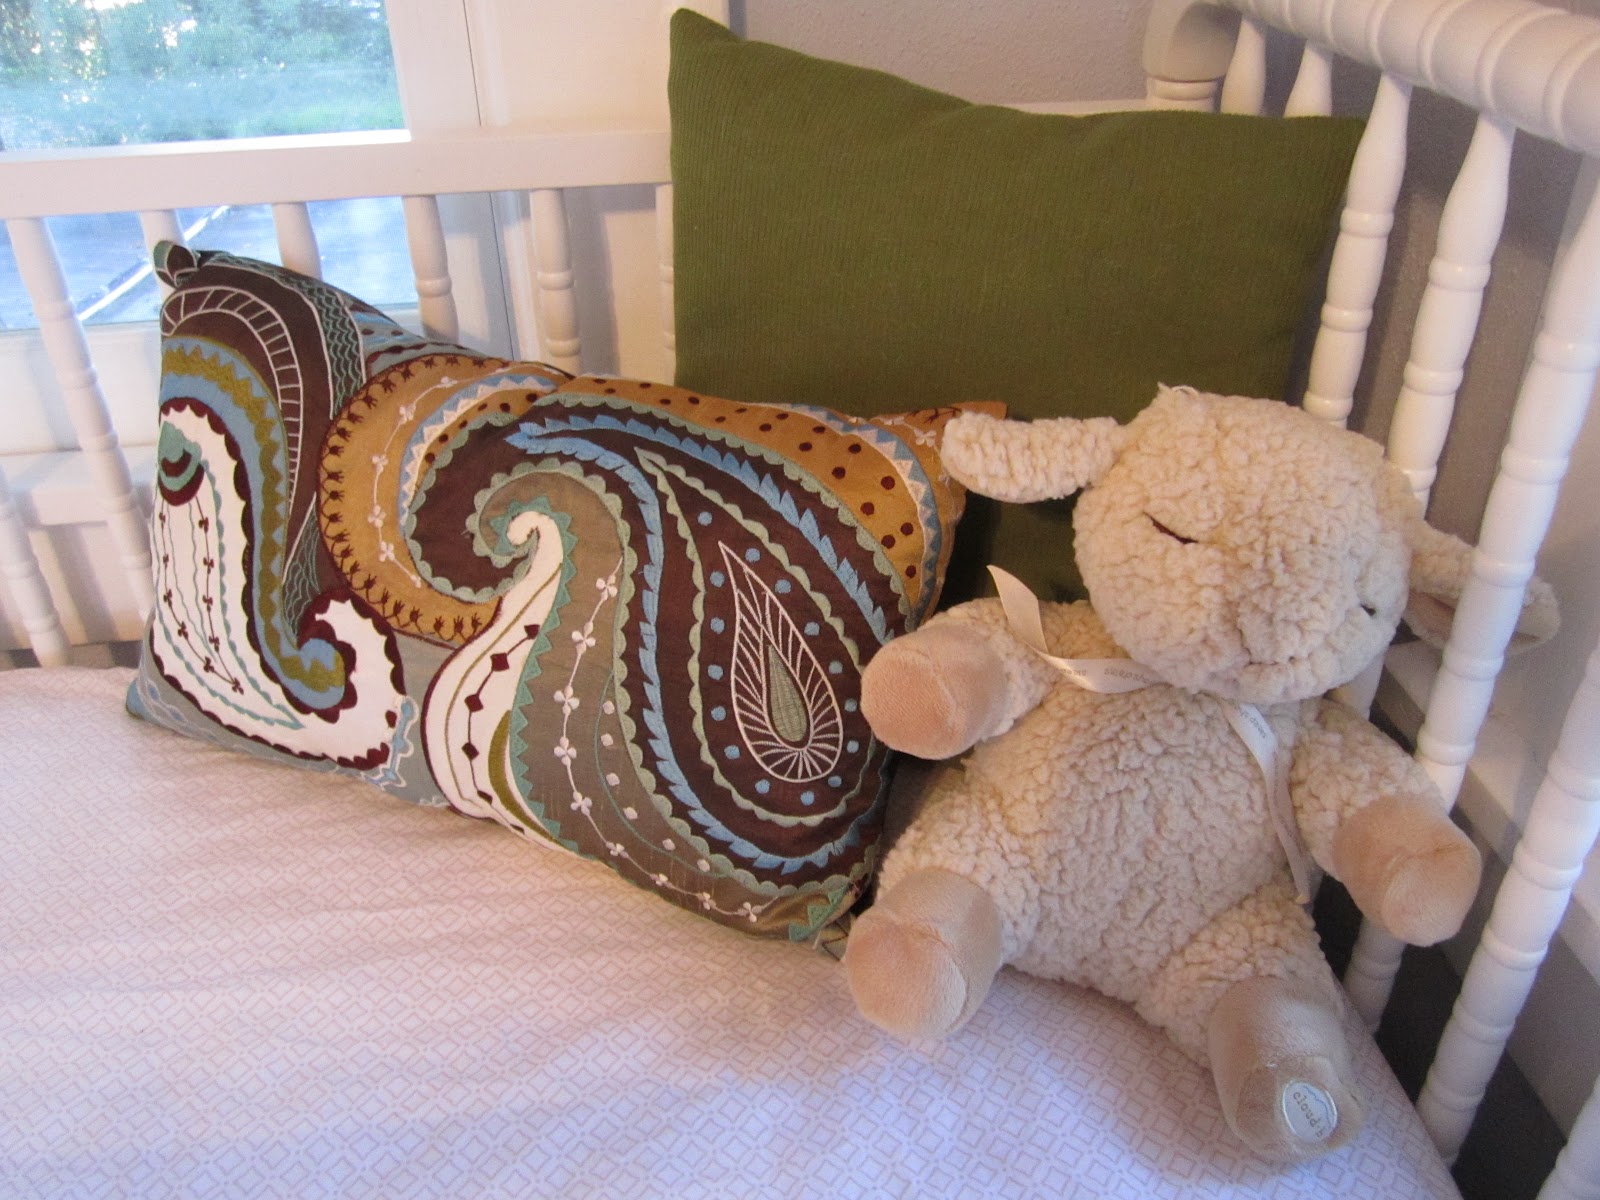
The crib (I will have better shots later once I add a little better decoration) is the DaVinci Jenny Lind crib in white. I love the vintage feel and look of it! The bed skirt was a hard find from eBay. It is the since discontinued Dwell Studio for Target skirt in blue, which matched the turquoise in the rug perfectly. I bought it new. The green chevron bins are also from Target and match the small bin on the changing table. I got one as part of a baby gift, and picked up another for more storage. One holds towels, soap and toys for bath time, and the other holds miscellaneous items like the Bumbo tray and grocery cart covers. I made the chalk board tags using ribbon, Chalk Board ConTact paper, and wooden hippos from Michaels (seen here on the diaper cake, but since these are in a scrapbook, I bought more). Luckily, because the crib mattress is up high for a newborn, there is plenty of storage underneath for extra boxes of diapers and wipes too!


Across the room from the changing table is a dresser, which you saw a preview of here.  The lamp was in our old guest room and was originally from HomeGoods for $35. You will also see the monitor mounted on the top of the dresser. It needs to be turned a bit, since we moved the crib, but with the height of the mirror, it sits at a perfect vantage point to the crib.


On all three sides of the room are great shelves above the windows. Over the crib, we have my parenting baby books, along with nursery rhymes and a few accessories. I love my brass piggy bank hanging out with the Barnyard Animals finger puppets, not to mention the hippo rocking toy and purple "wedding fund" piggy bank. 


The other window is a bit dark, but has some fantastic books, dolls, and a vintage Snoopy pull toy that I love! In case you didn't pick up on it, the room has three walls of windows, but I only showed two shelves. The third one, over the rocker and changing table, actually has letters of Baby D's name and her collection of hippos. You'll have to wait until she is born for the big reveal!


The rocking chair actually belonged to my husband's great great grandmother, and I love how it matches so perfectly! I just hope Baby D doesn't spit up all over it!!!


In the corner we have some more of my favorite books on an antique round table, with a photo of us and Maybee (our furry child). Also is a piggy bank (the "fashion fund") and a plush hippo. I am also in love with the 3 Sprouts hippo bin that holds all her toys and plush animals. It is so cute!!


Above the table is a piece of canvas art that was found and given to me by my friend Amy. She saw something similar on my Pinterest board, and it is just perfect in the corner of the room!


 The room already had a twin bed in it, which I think is perfect for those fussy late nights where momma will need to be close. I used linens and pillows I had from our last guest room that matched the rug. I picked up the hamper from Target and attached another hippo chalk board tag on it.


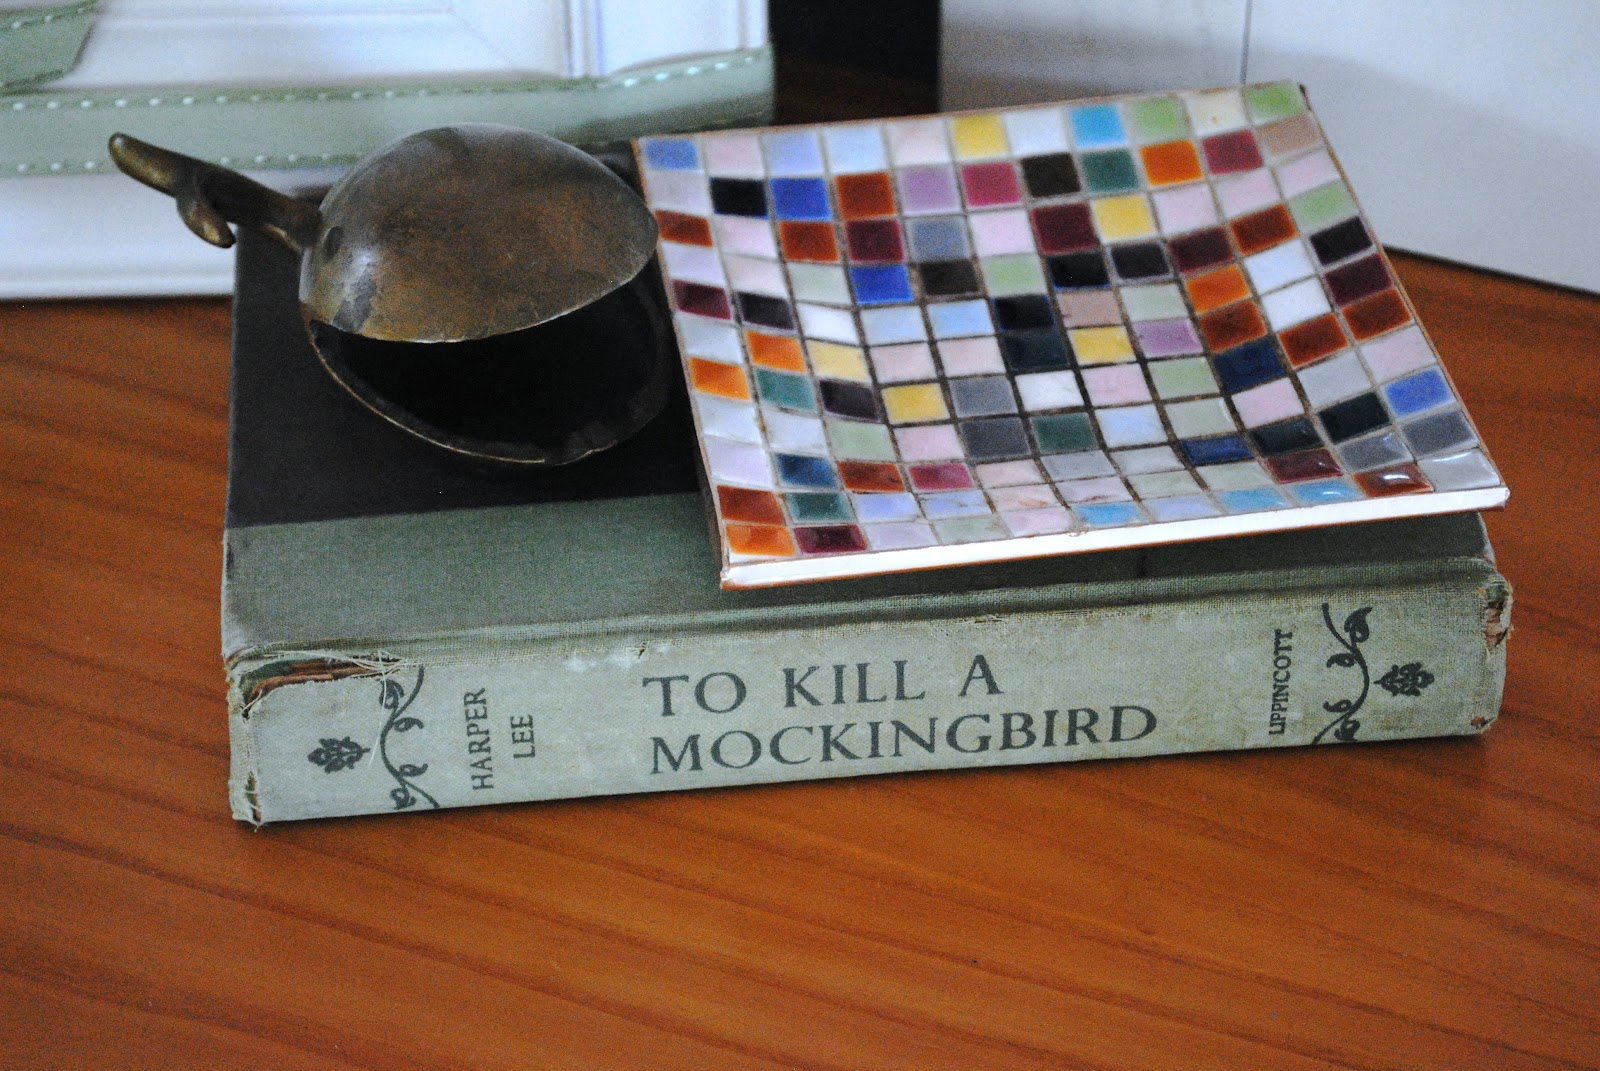
Lastly, on the dresser is a framed paper cutout hippo that my mother made (amazing!), one of my favorite childhood books in its first year of print (gifted from my grandmother), a mosaic catch all dish, and a brass whale we found at an antique market. 


There are just a few details left I want to do to make it 100% complete:
-Find some artwork for over the twin bed
-Find a cute pillow for the crib (which I will take out when she sleeps so we don't give her any suffocation hazards - more on SIDS here)
-Frame some vintage photos of our parents and grandparents when they were children for the room

And another safety note.... all of the shades are adjusted so that Baby D cannot get caught in any of the pull strings. As a newborn, she won't be able to reach them anyway, but I took precautions just in case. There is a lot of natural light into this room, but if you pull the shades all the way down, it does give a bit of darkness for her daytime naps. At night, it is very dark and peaceful.


Other than buying the crib and bedding, I think we did pretty well on making a nice nursery room out of things we already owned. It is pretty serene and accommodating, and we have really maximized the use of space. Thanks for visiting!!!

Tuesday, May 15, 2012

Key Lime Mini Pies

In celebration of Mother's Day on Sunday, we had a large family cookout at my parent's house. My mom asked me to make her Key Lime Pie recipe, originally from the PierHouse restaurant in Key West.  She has had this recipe as long as I can remember, and it is by far my favorite Key Lime Pie, perfect for those warm summer nights. However, in true FTH form, I tweaked the recipe to make MINI Key Lime Pies, and I have to tell you, I was thrilled with the results! Here's how to do it:

Get a 12-count muffin tin and line the tin with paper baking cups. I try not to use the foil ones, as they sometimes continue to cook the dough inside after removing from the oven.


Next, prepare the Graham cracker crust with the following ingredients:
2 cups graham cracker cookies (crushed) or 2 cups of boxed crushed graham cracker crust (HoneyMaid)
1/4 cup sugar
3/4 cup butter, melted

Combine all the ingredients until well blended.


Next, I filled each baking cup with one heaping Tablespoon of the graham cracker crust mixture. You may have a little bit left over, but just set aside until the next step.


Using your fingers, press the crust mixture into each cup, getting it evenly distributed on the bottom, and 3/4 of the way up the sides of the baking cup. This will actually help the baking cups sit down into the pan, and make sure the crust is evenly distributed. Use some leftover crust mixture to even out the sides of each baking cup. 


Place pans into the refrigerator to chill until pie filling is ready.

For the filling:
4 eggs separated (only the yolks will be used)
1 14oz can of sweetened condensed milk
1/2 teaspoon cream of tartar
1/2 cup key lime or Persian lime juice (we like the Aunt Nellie's brand of key lime juice, but if you can't find it at your local grocery, regular bottled lime juice will do). Or if you have some extra time,  squeeze juice from fresh limes.

Preheat the oven to 325 degrees. Place the egg yolks into a bowl and using an electric hand mixer, beat the egg yolks on high until thick and light in color.


Next, add the sweetened condensed milk, and mix on low speed. 


While keeping the mixer on slow speed, add half the lime juice and cream of tartar.


Once that is mixed in well, add the remaining lime juice and mix until well blended. It should be thick and creamy!


Remove the crusts from the fridge, and using a small soup spoon or ladle, pour the pie mixture into the crusts. 


Be sure to fill them up to the top of the crust, as they will condense a bit after baking. 


Bake for 10-15 minutes (mine took about 15-16 minutes, but I checked them often) until the middles are firm. Remove from the oven, and chill in the refrigerator for about 1-3 hours.


Right before you are about to serve them, remove them from the fridge and top with light whipped cream and a lime slice for a pretty presentation!


These got rave reviews, mostly because the crust was thick and it was the perfect size dessert. If you notice in pictures, I actually made 24 mini pies, so I simply doubled the recipe above. And if you want to make a regular Key Lime pie, it is the same recipe and cooking instructions, just simply add the pie crust to a 9" pie pan. Here's to summer baking!!

Thursday, May 10, 2012

Missing the 80's....

I was looking through my favorites on Etsy recently, and popped into one of my favorite "shops". Low and behold, I came across one of my favorite memories of being a child from the 80's:


Who else had a plastic charm necklace like this one, with all the clips and bells attached to random plastic figurines??? Totally took me back. The price ($185), however, made me gasp, and wondering if my mom still had mine in my childhood treasures. I found another cheaper one on eBay here if you still don't mind shelling out some dough. But then again, how much is nostalgia worth? And how cool would it look with a black sheath dress and a colorful pair of heels...

Monday, May 7, 2012

Getting Organized

I have a bit of OCD when it comes to clothes and organization. My closet is color coordinated, and my underwear drawer has dividers and things folded. This may change once the baby is born, or it may just get worse... we will see! In an effort to keep things organized in Baby D's room, I picked up a few things at Bed Bath and Beyond this weekend to help keep the drawers organized with her clothes and accessories. If you thought I was kidding before when I said she will be best dressed, check out the collection she already has going.

Socks, pacifiers, hair clips, pacifier clips, and sunnies:


I purchased the clear/green drawer divider on clearance at TJMaxx for $5. I like that the green bottom is rubber, so that these little accessories don't roll all around the drawer.

On the other side, I used a vintage teal chalice to hold her headband collection, and used the remaining space for her hats (a must in sunny Florida!) and her cute summer sandals and shoes. 


At Bed Bath and Beyond, I purchased some spring loaded drawer dividers for two drawers to separate her clothes. I have them grouped by daytime (onesies, tops and legging sets), night time (sleep sacks and pjs) and dresses for each age group. The photo below is actually her big girl drawer with two dividers, as the clothes to the left are 6 months (with the exception of her 3-6 month old Gator gear, ready for football season this fall!), the middle section is for 6-9 months, and the right is 9-12 month old clothes. With the clothes divided, it not only allows me to know what section she really fits into, but will be easier for dad too to know what to dress her in if I am not around.


In another drawer, its more of a miscellaneous mix of baby items. Most of these will come and go in the next few months, but I needed a place to stick them for now in some sort of organized space. I purchased the clear Real Simple 6 Piece Organizer Set to keep things in their place.  I love how these thin clear boxes hold everything, fit nicely in the drawer, and can be moved around later as we change out the contents of the drawer.


Since the room is small, the more organized I can keep it, the better! Stay tuned for the finishing touches and more organization solutions.

Friday, May 4, 2012

Baby Shower Aftermath


Just as I thought I was getting the nursery near to completion, we were given a wonderful surprise baby shower from the colleagues at my husband's office, and this was the aftermath. Actually, this is the organized photo, but you wouldn't know it.

We have been so overwhelmed with our friends, family, and co-worker's generosity these past couple of months... and our baby girl is going to be so lucky to have all these wonderful people in her life. We cannot thank every one enough!!!   

And in other baby news, as I'm sure you will see plenty in more updates later, we have followed a tradition started by my mother-in-law. When she had each of her five kids, she picked an animal for them to collect. My husband Logan collected lions, and for Baby D, we chose hippos. We liked how they were an animal that are often found with lions and gators (what UF grad doesn't have a collection of gators?!), and that they are pretty darn cute too. Has anyone seen the pigmy hippos at Tampa's Lowry Park Zoo or Harry the Hippo?! We have started a hippo collection for Baby D, and love that for our surprise shower, they made a diaper cake with lots of hippos!!! It is too precious!

Check back soon (I promise, it will be done this weekend!) for our finished nursery and more cute hippo details.

Wednesday, May 2, 2012

Cute Baby Shower Favors

I still owe baby shower updates, but wanted to show you two quick baby shower favors. The first is not one from my baby shower, but from one of a family friend who is having a boy:

They took a Styrofoam cup and cut it and hot glued the sides over like a shoe. Next they added a brown and white bow and some blue tissue paper, and then filled the shoe with candy. How cute and simple is that?! I love it!

The other idea was a really cute from one of my showers, especially since it was more about the mom-to-be than the baby! Bourdeaux colored OPI nail polish and a cute saying for my stylish baby-to-be:

From fingerpaints to nail polish... Bottles to Bourdeaux... There's no doubt Baby D will always be the most stylish kid we know!

One of my favorite favors ever!

Have you come across some cute baby shower favors recently? If so, be sure to share!

SHOP